Understanding List Attributes
Lists allow an attribute to have more than one value. The following example illustrates the concept of list attributes and why you might use them.
Consider a city GIS department that has an Esri Geodatabase consisting of address points, and a CSV file containing all the species of trees in the city and their address locations.
The company’s GIS technician uses the Joiner transformer to connect the CSV records to the spatial data in a simple 1-to-1 relationship. The process works well until a particular address is found to have multiple records for multiple tree species. For example:
100 Dunsmuir St Redspire Pear
100 Dunsmuir St Chanticleer Pear
100 Dunsmuir St Flowering Cherry
How should the FME Joiner transformer handle a single spatial feature with three attribute values? By default, it creates three output feature types, which is not desired.
One method would be to concatenate all the species types into a single attribute, for example:
100 Dunsmuir St Redspire Pear, Chanticleer Pear, Flowering Cherry
But such an attribute is difficult to work with. For example, a Tester transformer applying the test
Tree Species=Redspire Pear would fail the above address, even though it contains Redspire Pear trees.
An alternate method is to create an attribute for each species. For example:
| Parcel Number | Tree Species1 | Tree Species2 | TreeSpecies3 |
|---|---|---|---|
| 100 Dunsmuir St | Redspire Pear | Chanticleer Pear | Flowering Cherry |
But this method is not much better. Many transformers can work with multiple attributes, but there may not always be the same number of attributes. It would be exceedingly difficult to design a workspace to handle an unknown number of attributes!
FME solves this problem by enabling the Joiner transformer to build a list, which permits any amount of values for a single attribute, and then providing a set of transformers specifically designed to handle this type of data structure.
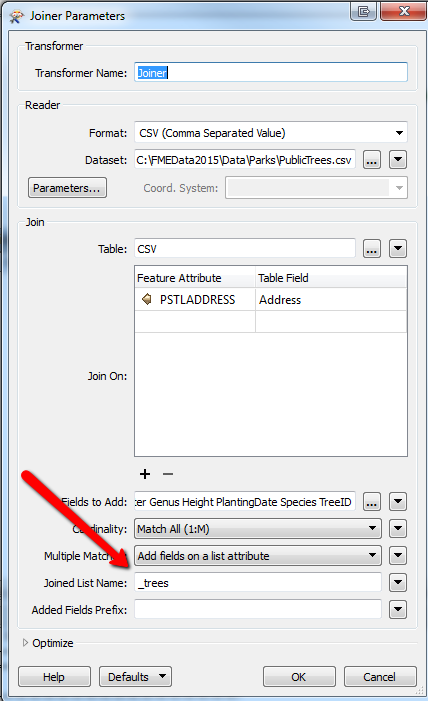
In Workbench, a list attribute is denoted by a pair of curly brackets.
After the brackets is a period ("." character) followed by the name of the attribute.
This transformer shows a list called "_trees" and a number of attributes in the list, such as "Species", "Diameter", "Height", and others:
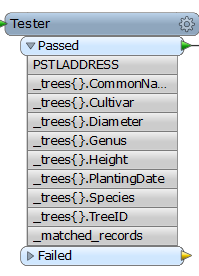
Each attribute in a list contains a set of values (elements). To actually obtain those values and use them in a workspace, they must be "exposed" as regular attributes.
To expose elements, right-click on the list attribute and select Expose Elements. In the Select List Elements dialog, specify the elements of the list to expose. Here, the first three elements of the list will be exposed. (Notice that element 0 is used to signify the first element in the list.)
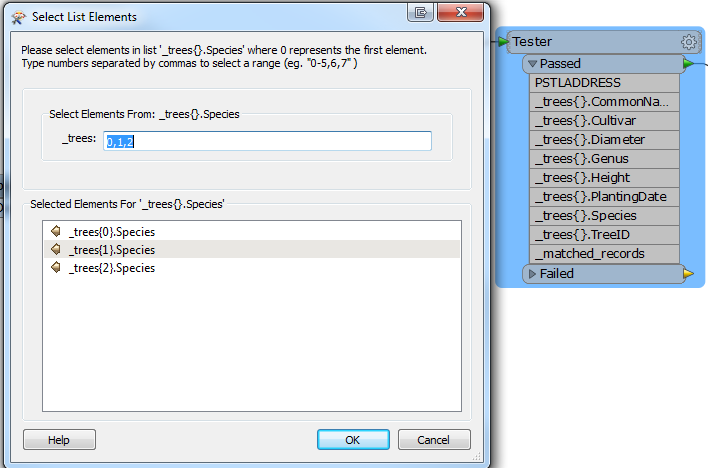
When elements in a list are exposed, they are added to the transformer as attributes. The name of the exposed attribute is the same as the list attribute name, except that the position of that item in the list is added as a number between curly braces.

In this example, three elements for attributes Species, Height, and Diameter were exposed; therefore nine additional attributes are now available in the workspace. The attributes (and their values from the previous example) are:
Attribute Value
_trees{0}.Species Redspire Pear
_trees{0}.Height 2
_trees{0}.Diameter 3
_trees{1}.Species Chanticleer Pear
_trees{1}.Height 3
_trees{1}.Diameter 2
_trees{2}.Species Flowering Cherry
_trees{2}.Height 9
_trees{2}.Diameter 3