Database Connection
Connections store authentication information. For general information about sharing database connections, please see Using Database Connections.
Note that different subsets of the Database Connection parameters below are made available in different contexts.
This parameter specifies a database connection for the reader through a drop-down menu. The Add Database Connection option in the menu allows for a new connection to be created. The new connection can be made visible only to the current user, or can be shared among multiple users.
Connection Parameters
This specifies the machine running the PostGIS/PostgreSQL ORDBMS as either an IP address or host name. The database must have proper permissions and be set up to accept TCP/IP connections if connecting from a remote machine.
When connecting remotely, this specifies the TCP/IP port on which to connect to the ORDBMS service. The default port is 5432.
This specifies the name of the PostGIS-enabled PostgreSQL database. The database must exist in the ORDBMS.
Enter the username and password to access the database, user account, or wherever authentication is required.
If this is not set, the Table List dialog will only show choices from the search path for the current user. Selecting specific schemas here will cause tables from those schemas to be shown instead.
This parameter also specifies the schemas to fetch candidate tables from when merging feature types. If it is not set, candidate tables are fetched based on the search path for the current user.
Constraints
After you have specified the database connection, click the Browse button to select tables for import. A connection window appears while the system compiles a table from the database.
Once the table list appears, you can select one or more tables, and then click OK to dismiss the window. The table name(s) will appear in the Table List field in the parameter box.
Schema Attributes
Use this parameter to expose Format Attributes in Workbench when you create a workspace:
- In a dynamic scenario, it means these attributes can be passed to the output dataset at runtime.
- In a non-dynamic scenario where you have multiple feature types, it is convenient to expose additional attributes from one parameter. For example, if you have ten feature types and want to expose the same attribute in each one, it is easier to define it once than it is to set each feature type individually in the workspace.
Using the minimum and maximum x and y parameters, define a bounding box that will be used to filter the input features. Only features that intersect with the bounding box are returned.
If all four coordinates of the search envelope are specified as 0, the search envelope will be disabled.
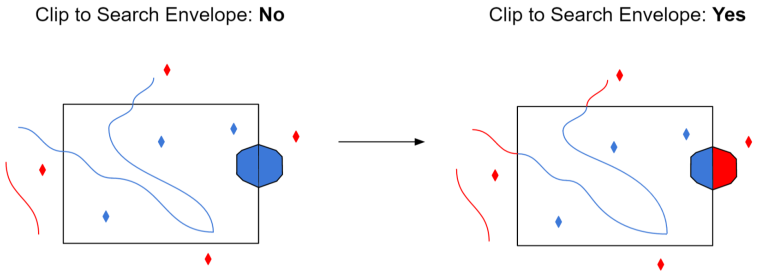
Select this parameter to remove any portions of exported features outside the area of interest.
The illustration below shows the results of the Search Envelope when Clip to Search Envelope is set to No on the left side and Yes on the right side.
- No: Any features that cross the search envelope boundary will be read, including the portion that lies outside of the boundary.
- Yes: Any features that cross the search envelope boundary will be clipped at the boundary, and only the portion that lies inside the boundary will be read. The underlying function for the Clip to Search Envelope function is an intersection; however, when Clip to Search Envelope is set to Yes, a clip is also performed in addition to the intersection.
