Build a Hello World package
This guide will teach you the basics of FME Package development. You will learn how to:
- Set up a development environment for FME Packages
- Create an FME Package by starting with a template
- Navigate the files and folders that comprise an FME Package and packaged transformer
- Use the FME Transformer Designer to view and modify transformers
- Edit a packaged transformer and see the changes reflected in FME Workbench
- Debug Python code using PyCharm Professional and Visual Studio Code
- Create tests for transformers and Python code
- Share FME Packages on the FME Hub
Set up a development environment
To develop an FME Package, you need FME installed, and a matching Python environment. The steps below assume a Windows environment with FME 2024 installed.
Install a Python interpreter
On macOS, use the FME Python interpreter
macOS users must use the Python interpreter included with FME. Create a virtualenv using the Python executable in the FME installation folder, and then activate it:
Start by installing Python on your system, taking care to match the version of Python included with your installed version of FME. Make Python available on your system path.
For instance, FME 2024 for Windows includes a 64-bit Python 3.12 interpreter, so you will need to install Python 3.12 for Windows 64-bit. You can check the version of Python included with FME by running the following command in your FME installation folder:
Create a working folder and virtualenv
First, create a working folder to store your FME Package project folder and Python virtualenv. Then open the folder in PowerShell, and run the following command:
This creates a folder called venv containing a Python virtualenv, which provides an isolated instance of Python for your development environment.
Enable PowerShell scripts
The next step involves running a PowerShell script, which may be disabled by default.
To allow PowerShell scripts to run, first run
Set-ExecutionPolicy RemoteSigned -Scope CurrentUser.
For more information,
see Microsoft's documentation about execution policies.
To use the virtualenv, run:
This adds a (venv) prefix to your shell prompt, to show that the virtualenv is in use.
Install the fme-packager utility
fme-packager is a Python command line utility that helps with FME Package development.
With the project's virtualenv activated, install fme-packager with the command:
FME Python library paths
The FME Python environment has a set of Python libraries, including the Python FME Objects API required to interact with FME. To make these libraries available in the virtualenv, run this command:
This command prompts for the path to your FME installation folder, and uses it to configure the virtualenv. Once this is done, the virtualenv becomes an approximation of the FME Python environment suitable for development purposes. IDEs such as PyCharm and Visual Studio Code will be able to resolve fmeobjects and other included Python libraries when using the virtualenv.
The Python environment is set up correctly if you can import fmeobjects:
(venv)> python
Python 3.12.2 (tags/v3.12.2:6abddd9, Feb  6 2024, 21:26:36) [MSC v.1937 64 bit (AMD64)] on win32
Type "help", "copyright", "credits" or "license" for more information.
>>> import fmeobjects
>>> fmeobjects.FMEFeature()
<fmeobjects.FMEFeature object at 0x000002208B1365B0>
Create a package using a template
The fme-packager utility includes a command to create an FME Package project based on templates provided by Safe Software. We will use this to set up an initial project structure containing a single transformer. In your working folder, run:
This command will prompt for various values, such as the desired package publisher ID, package ID, and transformer name. For the purposes of this guide, accept all the default values, including:
publisher_uid:examplepackage_uid:my-packagetranformer_name:DemoGreeterminimum_supported_fme:2024
About FME 2023 compatibility
This tutorial is designed for transformers which do not need to support FME 2023.
This tutorial can be used to create transformers for FME 2023 with two main changes:
- The transformer will require a different set of execution instructions.
- In the Python implementation, calls to
pyoutput()must omit theoutput_tagkeyword argument.
You will be able to change these values later.
Once all the prompts are answered, and assuming that the default values were accepted, the template will be written to a new folder named my-package. This is the FME Package project folder.
Install development dependencies
The FME Package project created by the template is not complete until its Python dependencies are installed:
(venv)> cd my-package/python/fme_demogreeter
(venv)> pip install -e '.[dev]'
(venv)> python-vendorize
First, pip install -e '.[dev]' installs the Python development dependencies,
which includes the python-vendorize command. Running it installs another dependency called fmetools,
which the transformer is built upon.
About fmetools
fmetools is a Python library maintained by Safe Software, and the FME Package template builds on top of it. It provides base classes and utilities to simplify the development experience.
For flexibility, fmetools has a release cycle that is independent of FME Workbench.
Therefore, every FME Package needs to include its own private copy of fmetools.
This is done using python-vendorize, which puts fmetools in
fme_demogreeter\src\fme_demogreeter\_vendor\fmetools.
The fmetools API reference is available at https://docs.safe.com/fme/html/fmetools/.
Set up editor
Now we are ready to open the FME Package project in an editor and configure it for code completion and inspection. Once this is done, your editor will be able to resolve fmeobjects and other libraries included with FME Workbench.
- Open the FME Package project folder in PyCharm.
- When prompted for a Python interpreter, select the project's virtualenv. If not prompted, then configure it in File > Settings > Project > Python Interpreter.
- Open the FME Package project folder in Visual Studio Code.
- Install the Microsoft Python extension. Instructions are available in the VS Code documentation.
- When prompted for a Python interpreter, select the project's virtualenv. If not prompted, then open the Command Palette using Ctrl+Shift+P and enter “Python: Select Interpreter”.
- Open the settings page with Ctrl+,.
Search for
python.languageServerand set it toJedi. This enables code completion for thefmeobjectsmodule.
Package project structure
The FME Package project template created a set of files that together form a complete FME Package containing a single packaged transformer. The most important items for the purposes of this guide are:
- package.yml: This contains the metadata for the FME Package:
fpkg_version: 1 # (1) uid: my-package # (2) publisher_uid: example name: My FME Package description: A short description of my FME Package. version: 0.1.0 # (3) minimum_fme_build: 24158 # (4) author: name: FME Lizard package_content: # (5) transformers: - name: DemoGreeter version: 1 python_packages: - name: fme_demogreeter- This is the version of the FPKG specification. It is always 1.
publisher_uidanduidtogether form the unique identifier for the package.versionis the version of this package. It must follow Semantic Versioning.minimum_fme_buildis the minimum FME build number supported by this package. It is important to test packages against this value, as Python versions, libraries, and APIs differ across versions of FME.package_contentdeclares all the components included in the package. Here it declares a transformer named DemoGreeter, with a latest version of 1. It also declares a Python package named fme_demogreeter, which contains the code used by DemoGreeter.
- README.md: This Markdown file describes the contents of the FME Package. If the package is uploaded to FME Hub, this file serves as the description shown in the package's FME Hub listing.
- python\fme_demogreeter: This folder contains the Python implementation of the DemoGreeter transformer. It is structured as a Python package. For details about authoring Python packages, refer to the Python Packaging User Guide.
- transformers: This folder defines the included transformers.
In our case, it only defines the DemoGreeter transformer.
- DemoGreeter.fmxj: This is the transformer definition file. It defines the user interface, ports, and feature routing logic for the transformer.
- DemoGreeter.md: This contains the description of DemoGreeter shown to users in the Quick Add pane of FME Workbench.
- help: This folder contains user documentation.
- DemoGreeter.md: This is the main documentation for DemoGreeter.
FME Transformer Designer
FME Transformer Designer, introduced in FME 2023, is a tool for authoring transformers. It provides a graphical way to define the user interface of a transformer, such as its parameters, ports, exposed attributes, versions, and more.
Transformer definition file
Each transformer is defined by an FMXJ file. FMXJ files define a transformer's user interface and how features get processed.
FMXJ transformer definition files are JSON documents edited using the FME Transformer Designer. Double-click DemoGreeter.fmxj to open it in the FME Transformer Designer.
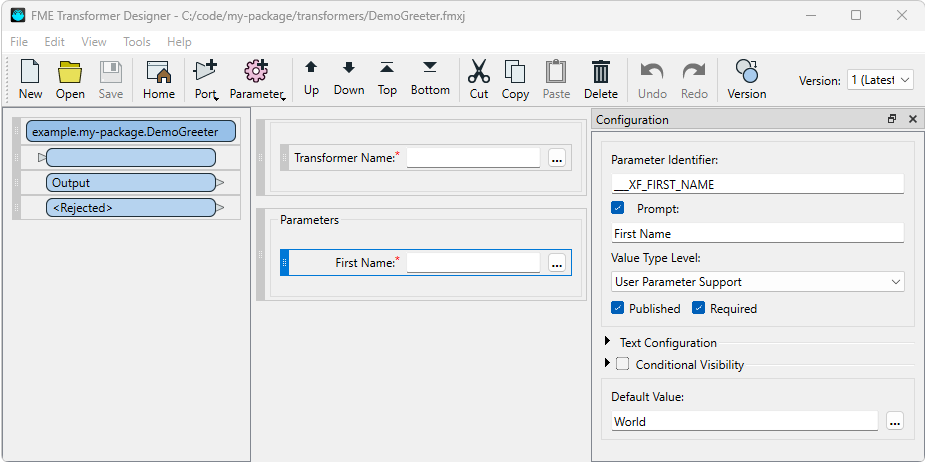
A preview of the DemoGreeter transformer appears on the left, showing its input and output ports. The transformer's parameters and parameter groups are defined in the middle. The Configuration pane on the right shows the configuration for the selected port or parameter.
Here's an overview of what is defined for the DemoGreeter transformer:
- One input port.
- Two output ports:
Output: The default port for output features. Its Attributes To Add configuration defines_greetingas an output attribute. This is also called an exposed attribute. Defining an attribute here makes it available as a choice for any field that allows the selection of an attribute as its value. Later, we will see the Python code set this attribute.<Rejected>: The output port for rejected features. It defines output attributesfme_rejection_codeandfme_rejection_message.
- Two parameters:
- Transformer Name: This is always the first parameter of a transformer, and cannot be removed. It is used to differentiate multiple instances of the same transformer in a workspace.
- First Name, inside a Parameters group: This is a text field with a default value of "World".
Its Parameter Identifier is
___XF_FIRST_NAME. The___XF_prefix is a convention that is used to avoid naming conflicts and make it easier to work with parameter names. Later, we will see the Python code read this parameter.
Execution instructions
Next, we will look at the part of the transformer definition file that specifies how features pass through the transformer. Open the Execution Instructions pane from the View menu. The Execution Instruction Template contains the following:
# Put config values onto input feature as internal-prefixed attributes.
# (1)
FACTORY_DEF {*} TeeFactory
   FACTORY_NAME { $(XFORMER_NAME)_CATCHER }
   $(INPUT_LINES)
   OUTPUT { FEATURE_TYPE $(XFORMER_NAME)_READY
      @SupplyAttributes(___XF_VERSION, 1)
      $(FME_PARM_VAL_LIST)
   }

# Pass input feature to Python.
# Remove all internal-prefixed attributes before emitting feature
# through the correct output port.
# (2)
FACTORY_DEF {*} PythonFactory
    FACTORY_NAME { $(XFORMER_NAME) }
    INPUT { FEATURE_TYPE $(XFORMER_NAME)_READY }
    SYMBOL_NAME fme_demogreeter.transformer.TransformerImpl
    PY_OUTPUT_TAGS { Output <Rejected> }
    OUTPUT { Output FEATURE_TYPE $(OUTPUT_Output_FTYPE)
      @RemoveAttributes(fme_regexp_match,^___XF_.*$)
      $(OUTPUT_Output_FUNCS) }
    OUTPUT { <Rejected> FEATURE_TYPE $(OUTPUT_<Rejected>_FTYPE)
      @RemoveAttributes(fme_regexp_match,^___XF_.*$)
      $(OUTPUT_<Rejected>_FUNCS) }
- This TeeFactory sets all the parameters as attributes on the input feature. This is how the Python code gets parameter values.
- This PythonFactory passes the resulting feature to the fully-qualified Python class name specified by
SYMBOL_NAME. This is how the transformer invokes Python code. The Python code is responsible for tagging features for output to either theOutputor the<Rejected>port. Before outputting the feature, the PythonFactory removes attributes that start with___XF_. In the next section, we will see how features are processed in Python.
# Put config values onto input feature as internal-prefixed attributes.
# (1)
FACTORY_DEF {*} TeeFactory
   FACTORY_NAME { $(XFORMER_NAME)_CATCHER }
   $(INPUT_LINES)
   OUTPUT { FEATURE_TYPE $(XFORMER_NAME)_READY
      @RenameAttributes(FME_STRICT,___fme_rejection_code___,fme_rejection_code)
      @SupplyAttributes(___XF_VERSION, 1)
      $(FME_PARM_VAL_LIST)
   }

# Pass input feature to Python.
# (2)
FACTORY_DEF {*} PythonFactory
    FACTORY_NAME { $(XFORMER_NAME) }
    INPUT { FEATURE_TYPE $(XFORMER_NAME)_READY }
    SYMBOL_NAME fme_demogreeter.transformer.TransformerImpl
    OUTPUT { PYOUTPUT FEATURE_TYPE $(XFORMER_NAME)_PROCESSED }

# Remove all internal-prefixed attributes from output feature
# and emit to the correct output port based on value of fme_rejection_code.
# (3)
FACTORY_DEF {*} TestFactory
    FACTORY_NAME { $(XFORMER_NAME)_ROUTER }
    INPUT { FEATURE_TYPE $(XFORMER_NAME)_PROCESSED }
    TEST &fme_rejection_code == ""
    OUTPUT { PASSED FEATURE_TYPE $(OUTPUT_Output_FTYPE)
        @RenameAttributes(FME_STRICT,fme_rejection_code,___fme_rejection_code___)
        @RemoveAttributes(fme_regexp_match,^___XF_.*$)
        $(OUTPUT_Output_FUNCS) }
    OUTPUT { FAILED FEATURE_TYPE $(OUTPUT_<Rejected>_FTYPE)
        @RemoveAttributes(___fme_rejection_code___)
        @RemoveAttributes(fme_regexp_match,^___XF_.*$)
        $(OUTPUT_<Rejected>_FUNCS) }
- This TeeFactory sets all the parameters as attributes on the input feature. This is how the Python code gets parameter values.
- This PythonFactory passes the resulting feature to the fully-qualified Python class name specified by
SYMBOL_NAME. This is how the transformer invokes Python code. In the next section, we will see how features are processed in Python. - This TestFactory forwards output features to either the
Outputport or the<Rejected>port based on whether the PythonFactory's output features have thefme_rejection_codeattribute set. Before outputting the feature, it also removes attributes that start with___XF_.
About rejected ports
The <Rejected> port is implemented by convention, and its output is conditional on the setting of
the fme_rejection_code attribute. The TeeFactory and TestFactory have lines to ensure that
input features with fme_rejection_code already set do not incorrectly cause DemoGreeter to forward
features to the <Rejected> port.
For more information about authoring transformer definition files, refer to the FME Transformer Definition Documentation and the FME Factory and Function Documentation.
Python transformer implementation
Recall that the Execution Instruction Template contains a PythonFactory that specifies the Python implementation of the transformer:
FACTORY_DEF {*} PythonFactory
    FACTORY_NAME { $(XFORMER_NAME) }
    INPUT { FEATURE_TYPE $(XFORMER_NAME)_READY }
    SYMBOL_NAME fme_demogreeter.transformer.TransformerImpl
    PY_OUTPUT_TAGS { Output <Rejected> }
    OUTPUT { Output FEATURE_TYPE $(OUTPUT_Output_FTYPE)
      @RemoveAttributes(fme_regexp_match,^___XF_.*$)
      $(OUTPUT_Output_FUNCS) }
    OUTPUT { <Rejected> FEATURE_TYPE $(OUTPUT_<Rejected>_FTYPE)
      @RemoveAttributes(fme_regexp_match,^___XF_.*$)
      $(OUTPUT_<Rejected>_FUNCS) }
The Python class referenced by SYMBOL_NAME is defined in the file below:
"""
example.my-package.DemoGreeter implementation.
"""
from fmeobjects import FMEFeature
from ._vendor.fmetools.plugins import FMEEnhancedTransformer
from ._vendor.fmetools.paramparsing import TransformerParameterParser


class TransformerImpl(FMEEnhancedTransformer):
    """
    The Python implementation of the DemoGreeter transformer.
    Each instance of the transformer in the workspace has an instance of this class.
    """

    params: TransformerParameterParser
    version: int

    def setup(self, first_feature: FMEFeature):
        """
        Initialization steps based the first feature received by the transformer.
        """
        super().setup(first_feature)
        # Get transformer version from internal attribute on first feature,
        # and load its parameter definitions.
        # Note: TransformerParameterParser requires >=b24145 when running on FME Flow.
        self.version = int(first_feature.getAttribute("___XF_VERSION"))
        self.params = TransformerParameterParser(
            "example.my-package.DemoGreeter",
            version=self.version,
        )

    def receive_feature(self, feature: FMEFeature):
        # Pass internal attributes on feature into parameter parser.
        # Then get the parsed value of the First Name parameter.
        # By default, these methods assume a prefix of '___XF_'.
        self.params.set_all(feature)
        first_name = self.params.get("FIRST_NAME")

        # Set the output attribute, and output the feature.
        feature.setAttribute("_greeting", "Hello, {}!".format(first_name))
        self.pyoutput(feature, output_tag="Output")
Each instance of the transformer gets an instance of TransformerImpl, and its constructor takes no arguments.
The TransformerImpl.setup() method receives the first input feature.
The purpose of the method is to do one-time configuration of the transformer based on the first input feature.
Here, it loads the transformer parameter parser based on the transformer version specified by the
___XF_VERSION attribute, which only needs to be done once.
The TransformerImpl.receive_feature() method receives an input feature,
parses the ___XF_FIRST_NAME attribute using the parameter parser,
and then uses it to set the output attribute _greeting.
Finally, it outputs the modified feature by calling pyoutput().
The output_tag argument is set to Output so features are emitted through the Output port.
Do not access features after pyoutput()
After a feature has been passed to pyoutput(), it must not be accessed again.
This includes saving features for later use in process_group() or close().
Doing so will cause a crash.
This is a constraint on transformers that support Bulk Mode.
If attributes from features need to be saved for later use,
collect and save them from the feature instead of saving the features themselves.
If greater flexibility is needed, override has_support_for() to disable Bulk Mode:
class TransformerImpl(FMEEnhancedTransformer):
    def has_support_for(self, support_type: int) -> bool:
        if support_type == fmeobjects.FME_SUPPORT_FEATURE_TABLE_SHIM:
            return False
        return super().has_support_for(support_type)
For more details, see fme.BaseTransformer.has_support_for().
About output ports
By convention, a standard Output port as well as a <Rejected> port has been implemented.
To emit features through the Output port, set the output_tag argument of the pyoutput() method to Output. Features should be emitted through the <Rejected> port by using the reject_feature() method.
About internal attributes
The Python implementation of transformers can only receive features as input. Therefore, for the Python side to get the value of a parameter, the transformer definition file must set the parameter's value as an attribute on the feature before it is passed to Python. However, it is undesirable for these attributes to remain on the output features. This problem is solved by creating internal attributes, which are attributes set up to only exist within the context of the Python code.
In DemoGreeter.fmxj, the TeeFactory sets all the transformer's parameters as attributes on the
input feature just before it is passed to the PythonFactory, and then removes those attributes
in the PythonFactory immediately before the output feature is sent to an output port.
The ___XF_ prefix on parameter names helps prevent naming conflicts with attributes that may
already exist on the input feature, and makes it easy for the PythonFactory to identify and remove
all internal attributes prior to output.
About parameter parsing
Parameter values are set as internal attributes on the input feature. The internal attribute values need to be parsed before use. The fmetools.paramparsing.TransformerParameterParser class handles this task: it loads the parameter configuration from the transformer definition, which determines how each parameter is to be parsed. Then, for each input feature, all the internal attributes are passed to it, and the parsed values are fetched as needed.
For convenience, the get() and set_all() methods on TransformerParameterParser
assume that parameter names and internal attribute names are prefixed with ___XF_.
TransformerParameterParser on FME Flow
Instantiating TransformerParameterParser on FME Flow requires FME Flow b24145 or newer.
Instantiating the class on older versions of FME Flow will raise an exception.
Build, install, and see the package working
An FME Package project folder cannot be directly used in FME Workbench. Instead, its contents must be built into an FPKG file using the fme-packager tool, and then installed.
In the root folder of your FME Package project, run the following command:
This command performs some validation of the package and, if it passes, outputs a single FPKG file that is saved to the dist folder.
If you had kept all the default values when setting up the package template,
you should now have the file dist\example.my-package-0.1.0.fpkg.
To install the package into FME, double-click it or open FME Workbench and drag the FPKG file onto the canvas.
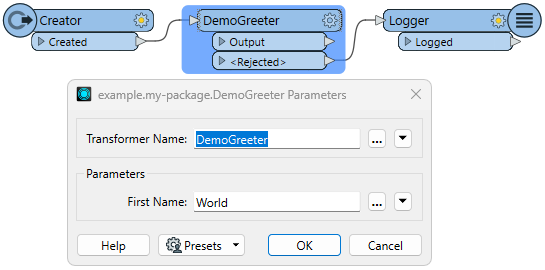
Once the package is installed, you can immediately start using it. Try it out by creating a simple workspace:
- Add a Creator to the canvas.
- Add DemoGreeter, which comes from the FME Package you had just installed. Open its settings and observe that its First Name parameter is set to “World”. This is the default value set in the transformer's definition file.
- Add a Logger.
- Ensure the Creator output is connected to the DemoGreeter input, and the DemoGreeter output is connected to the Logger input.
Save the workspace as fpkg-test.fmw, then run it and observe in the log window that the logged feature
has an attribute named _greeting with the value "Hello, World!". This was added by the DemoGreeter transformer.
Congratulations! You have successfully built, installed, and run a packaged transformer.
Installed packages can be managed in FME Workbench. To list, update, or remove installed packages, go to Tools > FME Options > FME Packages.
Edit the installed package
Next, we will make some simple changes to the packaged transformer, and have those changes reflected in FME Workbench.
Make the following changes in your package project:
# Find this line:
feature.setAttribute("_greeting", "Hello, {}!".format(first_name))
# and replace it with:
feature.setAttribute("_greeting", "Greetings, {}!".format(first_name))
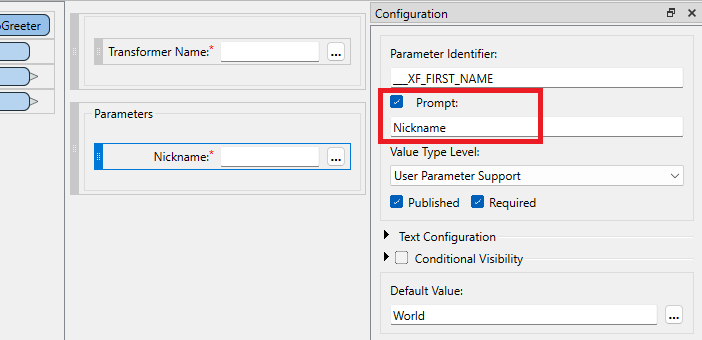
Next, open DemoGreeter.fmxj in the FME Transformer Designer. Select the First Name parameter, and change the Prompt from "First Name" to "Nickname". Then save the file.
Installed package source redirection
To have these changes reflected in FME Workbench, you can rebuild and reinstall the package. But this can be inconvenient during development, and an alternative is available.
After installing a package into FME, you may redirect it to use the code in your package project folder instead of the installed files. This is convenient during development, as code changes are quickly reflected in FME Workbench.
To do this, we will delete specific installed package folders and configure environment variables that direct FME to load those folders from the package project instead.
First, navigate to the FME Packages installation root folder.
On Windows, this is %APPDATA%\Safe Software\FME\Packages\NNNNN-win64,
where NNNNN is the build number of the installed FME.
Take note of the following paths and how they correspond to paths in the package project folder:
| Installed package path | Package project path |
|---|---|
| python\example.my-package\ | python\fme_demogreeter\src\ |
| transformers\example.my-package\ | transformers\ |
- Set the
FME_PYTHON_PATHenvironment variable to the absolute path to your package project's Python source folder. For instance,C:\code\my-package\python\fme_demogreeter\src. - Delete the installed package's Python folder. In the example above, that's
%APPDATA%\Safe Software\FME\Packages\NNNNN-win64\python\example.my-package. It's important to delete this folder because it takes priority overFME_PYTHON_PATH. - Set the
FME_SHARED_RESOURCE_DIRenvironment variable to the absolute path to your package project's root folder. Do not set it to thetransformerssub-folder, as that step is done by FME. - Delete the installed package's transformers folder. In the example above, that's
%APPDATA%\Safe Software\FME\Packages\NNNNN-win64\transformers\example.my-package.
Restart FME Workbench and open fpkg-test.fmw.
Open the parameters for DemoGreeter and observe that the changes made earlier are reflected:
the First Name field is now called Nickname.
Then run the workspace, and note that the _greeting attribute now has a value of “Greetings, World!”
FME Workbench may cache transformer definitions and Python code
Changes to transformer files may not be reflected until FME Workbench is restarted or the Transformer Gallery is reloaded. To reload the Transformer Gallery, click the button on the bottom right corner of its pane. The Transformer Gallery pane can be enabled under View > Windows > Transformer Gallery.
Python code may be cached in certain execution contexts, such as in transformer parameter dialogs. Code changes may not be reflected in those contexts until FME Workbench is restarted.
Pitfalls and limitations of package source redirection
FME_SHARED_RESOURCE_DIRcan only be used to redirect thetransformerfolder. Other package content cannot be redirected in this manner.- The redirection of the
transformerfolder toFME_SHARED_RESOURCE_DIRis available for FME 2024.1 b24596 and newer. - Items installed from the
web_servicesfolder are not found in the filesystem because they are installed into the FME connection storage database. To have changes in packaged Web Services be reflected in FME Workbench, the package must be built and reinstalled. - Using folder symlinks is a convenient alternative solution, but requires care. The package reinstallation process is not symlink aware, which can result in files being deleted unexpectedly.
Connect a Python debugger
While developing an FME Package, it can be useful to step through the Python code as it is running, especially when it is running within FME. This can be done with remote debugging tools.
In this section, you will get started with remote debugging of Python running in FME, using PyCharm Professional or Visual Studio Code.
Remote debugging in PyCharm requires a PyCharm Professional license.
First, create a new Python Debug Server run/debug configuration and name it “Remote Debug”. Set the IDE host name to localhost and port to 12345.
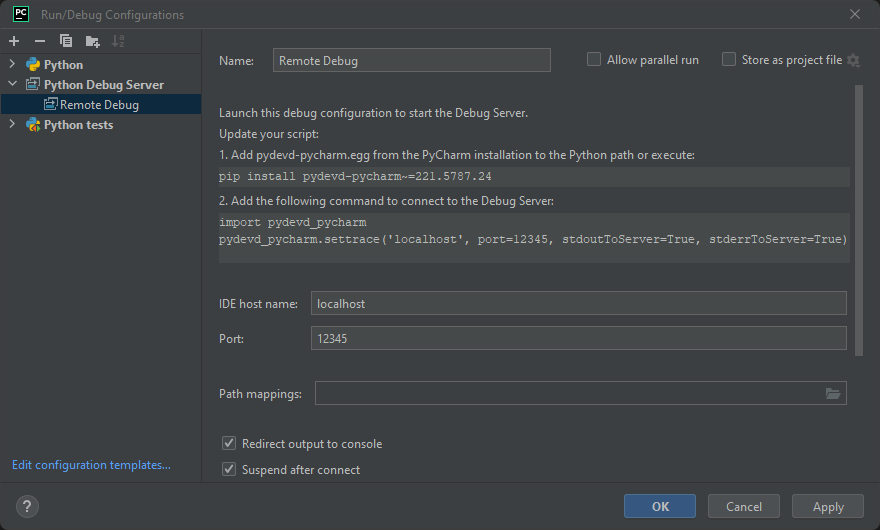
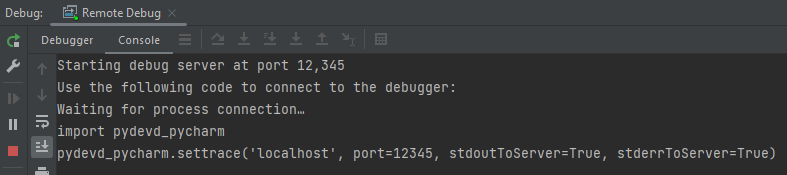
Next, launch the Remote Debug configuration. Observe that the console output shows that it is listening for incoming connections, with instructions for how to connect. We will return to this shortly.
Finally, install the pydevd-pycharm library for use in FME. Open your FME installation folder in a terminal, and run:
If you are using FME 2024, which includes Python 3.12,
this will install the library to %USERPROFILE%\Documents\FME\Plugins\Python\python312.
Start a remote debug session
Recall that the Remote Debug configuration showed the lines of code needed for connecting to the debugger.
Update TransformerImpl.receive_feature() and add those lines at the beginning:
class TransformerImpl(FMEEnhancedTransformer):

def receive_feature(self, feature: FMEFeature):
    import pydevd_pycharm
    pydevd_pycharm.settrace("localhost", port=12345,
        stdoutToServer=True, stderrToServer=True)
    ...
With the Remote Debug configuration running in PyCharm, run a workspace with the DemoGreeter transformer. The transformer's Python code running in FME attaches to PyCharm.
To set up remote debugging in Visual Studio Code, first ensure that the Microsoft Python extension is installed.
- Open the Run and Debug pane (Ctrl+Shift+D) and click “create a launch.json file”.
- When prompted to select a debugger, choose “Python”.
- When prompted to select a debug configuration, choose “Remote Attach”. Keep the default settings of localhost and port 5678.
- Edit launch.json and set the remoteRoot to
${workspaceFolder}.
Next, install the debugpy library for use in FME. Open your FME installation folder in a terminal, and run:
If you are using FME 2024, which includes Python 3.12,
this will install the library to %USERPROFILE%\Documents\FME\Plugins\Python\python312.
Start a remote debug session
Update TransformerImpl.receive_feature() to include these lines at the beginning:
class TransformerImpl(FMEEnhancedTransformer):

    def receive_feature(self, feature: FMEFeature):
        import debugpy
        debugpy.listen(5678, in_process_debug_adapter=True)
        debugpy.wait_for_client()
        ...
Then set a breakpoint on the first line of code following debugpy.wait_for_client().
Now, run a workspace with the DemoGreeter transformer, and notice how the translation blocks. Attach the debugger by running the “Python: Remote Attach” configuration. The debugger stops at the specified breakpoint.
Writing tests
We recommend creating tests for your package, and make sure that they pass before sharing the package with others. There are two approaches to creating tests, each with their own benefits and drawbacks.
Workspace tests
This approach tests a package using workspaces that run either in FME Workbench or through the command line using fme.exe. Translation failures are interpreted as test failures. Failures can be triggered by uncaught Python exceptions or by routing features to a Terminator transformer.
When to use
Workspace tests are recommended for:
- Validating workflows that represent real world use of the package.
- Detecting compatibility issues that may arise when an old workspace runs under a newer version of a package.
- Scenarios that require values from many transformer parameters.
- Validating that the Python code correctly handles complex combinations of parameters.
Example
A simple workspace test for DemoGreeter uses a Tester to compare its output attribute against an expected value:
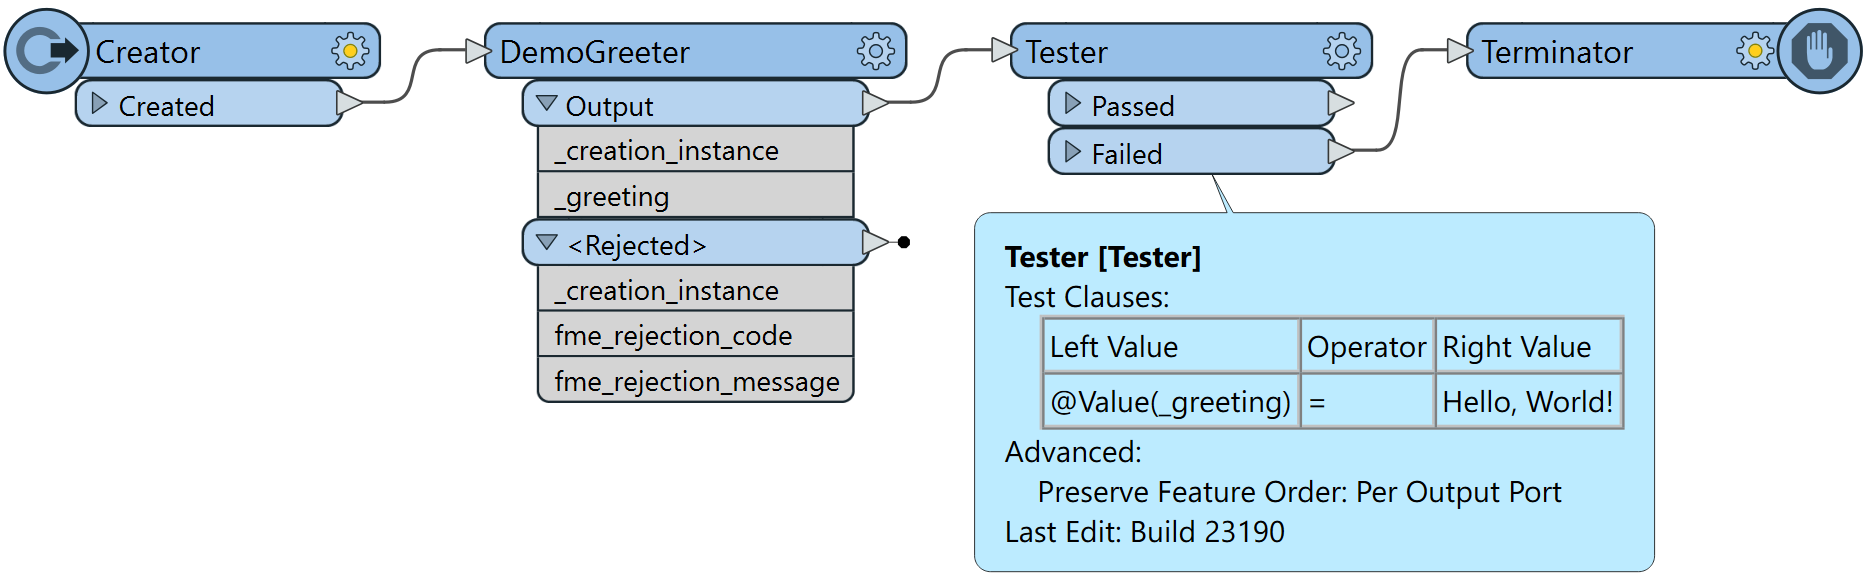
The Failed port of the Tester is connected to a Terminator. This causes the translation to fail if the feature fails the Tester. If the Rejected Feature Handling setting in the workspace is set to Terminate Workspace, then any unexpected output from the DemoGreeter rejection port will result in translation failure as expected. Otherwise, the rejection port should also be connected to the Terminator.
Python tests
This approach tests a package using a Python test framework such as pytest.
When to use
Python tests are recommended for:
- Testing of code paths that cannot be tested by running a workspace, for instance:
- Parameter types that invoke Python code within dialog windows
- Schema-related logic that only occurs when a format is added to a workspace
- Error handling in situations where feature rejection is unavailable or not applicable
- Scenarios where the integration with FME Workbench is not a major concern.
- Testing compatibility across Python versions, using a tool such as tox.
- Testing that involves mocked API calls and HTTP requests, using tools like unittest.mock or vcrpy. This is useful when testing against live services that may be unavailable or unreliable.
Example
The FME Package transformer template includes an example written using the pytest framework.
In the Python package folder, tests\test_transformer.py defines a test function that builds an
input feature and passes it to an instance of the transformer's Python implementation,
intercepts the output feature, and validates the output attribute on it.
Refer to the comments in the file for details.
Pytest was installed as part of the pip install -e '.[dev]' command that ran earlier.
To run the tests, run the pytest command in the Python package folder.
Visual Studio Code and PyCharm have integrations with pytest.
Sharing packages on FME Hub
Once you have created an FPKG file and are ready to share it with others, you can upload it to the FME Hub.
Start by creating an account on FME Hub.
Then create a publisher at https://hub.safe.com/publisher/new.
The publisher's Unique ID must match the publisher_uid in your package.yml.
Make sure to choose a unique and distinctive value as it cannot be changed.
Every package uploaded to FME Hub must have a unique version in package.yml that follows Semantic Versioning.
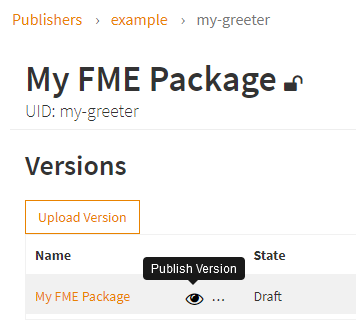
New package versions uploaded to the Hub start in the Draft state, which means users cannot find or download it. Once a version is published, it cannot be unpublished. To publish a package version, highlight its row and click the Publish Version button:
Feel free to experiment with managing packages on the FME Hub. Afterwards, you can delete the uploaded packages. Publishers that have no packages can also be deleted under the publisher's details page.