Automations
Automations allow you to design JSON messaging workflows that support a rich set of communication protocols. With a simple set of tools, you can leverage your FME Server to receive and send messages, and run workspaces on demand. This powerful combination allows you to control complex data flow patterns in your enterprise.
Automations are comprised of three primary components:
- Triggers: Listen for and receive messages from external clients or from within FME Server.
- External Actions: Send messages to external clients or inside FME Server.
- Actions: Process messages between triggers and external actions, either in an FME workspace, or through another tool.
Tip: You do not need an external message to run a workspace. You can schedule a workspace to run at specific times in the future with the Schedule trigger, or on demand with the Manual Trigger.
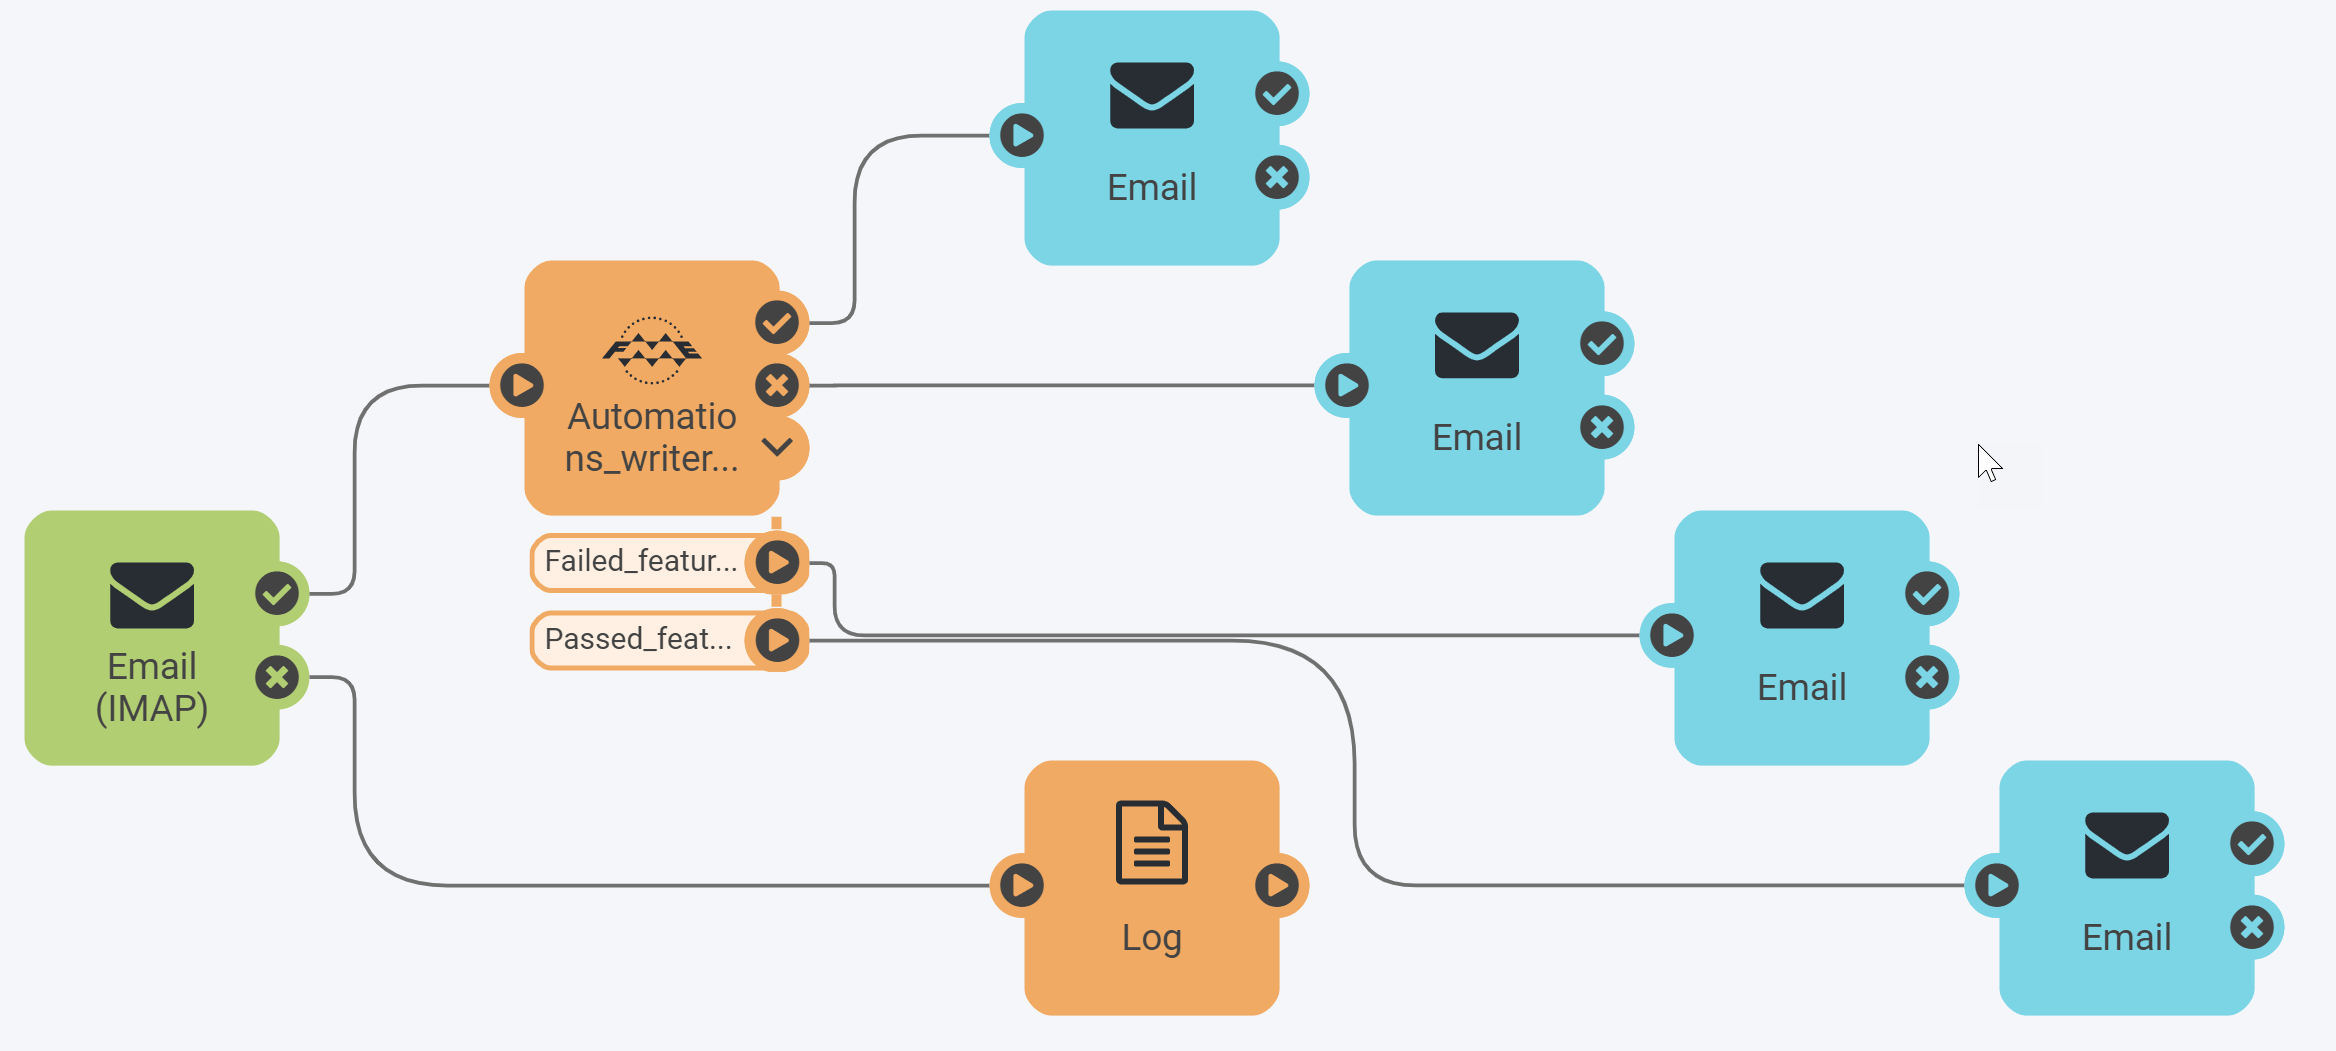
The example below illustrates a simple workflow comprised of a trigger that receives an email, an action to run a workspace, and an array of external actions that sends emails depending on the workspace results. An Email Received (IMAP) trigger sends messages to a Run Workspace action whenever an email from a specified IMAP server host is received. The workspace validates features in a file attached to the email, and reads features that pass validation into a database. The automation proceeds with separate Send an Email external actions based on the results of the validation in the Run Workspace action. One email sends details about features that passed validation and were read into the database, including details on feature type attributes. Another email sends details about features that failed validation. As well, two additional emails are sent depending on whether the workspace completed successfully or not. Finally, metadata about any Email Received triggers that fail to fetch emails is logged.
Mouse-over to view:
Getting Started with Automations
Start a new Automations workflow from the Get Started, Build Automation, or Manage Automations page. (To use an existing automation as a starting point, select it from the Manage Automations page, click Actions > Duplicate, and open the duplicated automation.)
To start, one undefined Trigger and "Next Action" (which can be either an action or external action) are placed on the workflow area. As you continue to define the workflow, additional "Next Action" components are added.
Alternatively, to add additional components, expand  . Double-click or click-and-drag from one of the applicable icons.
Tip: You can disable "guided mode" when building a workflow. Select Menu > Hide guides. To enable, select Menu > Show guides.
- Define Components
- Parameters: The settings required for the Trigger to function as desired.
- Output Keys: The JSON key-value pairs to include in the outgoing message. By default, all keys are included. Optionally, you can create your own keys. For more information, see Working with Output Keys in Automations Workflows.
- Parameters: The settings that are required for the action to function as desired.
- Output Keys: The JSON key-value pairs to include in the outgoing message. By default, all keys are included. Optionally, you can create your own keys. For more information, see Working with Output Keys in Automations Workflows.
- Advanced: Run options for workspaces.
- Retry: Settings that control attempts to run the action again in case of failure to connect to an external resource.
- Parameters: The settings required for the External Action to function as desired.
- Output Keys: The JSON key-value pairs to include in the outgoing message. By default, all keys are included. Optionally, you can create your own keys. For more information, see Working with Output Keys in Automations Workflows.
- Retry: Settings that control attempts to run the action again in case of failure to connect to an external resource.
- Save, Name, and Tag the Workflow
- Start the Workflow
Define triggers, actions, and external actions, as desired.
Double-click the trigger icon you want to define. Under Trigger Details, expand Select a Trigger Event and make a selection. For information about each trigger, including how to configure, see Automations Triggers.
Configure the following:
Tip: Where applicable, click Validate to test that your parameters work as expected.
For more information, see the documentation for the specified trigger under Automations Triggers.
Double-click the Next Action icon. Under Next Action Details, expand Select an Action and make a selection under Actions. For information about each action, including how to configure, see Automations Actions.
The canvas automatically connects your action to the previous component in the workflow. However, if connections are not specified, click an output port of an upstream component and an input port of the action. Alternatively, click and drag a connection line between ports.
Tip: Create connections to actions before configuring parameters. This way, you'll have access to any incoming parameters, where applicable. For more information, see Working with Parameters in Automations Workflows.
Configure the following, where applicable:
For more information, see the documentation for the specified action under Automations Actions.
Double-click the Next Action icon. Under Next Action Details, expand Select an Action and make a selection under External Actions. For information about each external action, including how to configure, see Automations External Actions.
The canvas automatically connects your external action to the previous component in the workflow. However, if connections are not specified, click an output port of an upstream component and an input port of the external action. Alternatively, click and drag a connection line between ports.
Tip: Create connections to external actions before configuring parameters. This way, you'll have access to any incoming parameters, where applicable. For more information, see Working with Parameters in Automations Workflows.
Configure the following:
Tip: Where applicable, click Validate to test that your parameters work as expected.
For more information, see the documentation for the specified external action under Automations External Actions.
Click the Save icon, or Select Menu > Save As. In the Save As dialog, specify a Name and one or more Tags (optional), and click OK.
Tip: If you have many workflows, use tags to organize them into meaningful categories. When viewing workflows on the Manage Automations page, you can filter on tags.
Workflows do not listen for incoming messages or run until you click Start Automation. Alternatively, you can start or stop workflows on the Manage Automations page.
Note: You cannot edit a workflow unless it is stopped. Click Stop Automation.
Other Tasks - Building Workflows
To run a workflow on demand
You can create a workflow that does not respond to any incoming message or schedule, but runs on demand, and allows you the option to pass in sample JSON data. This type of workflow uses a Manual Trigger in place of one of the other trigger options. Manual triggers are useful when you want to test a workflow before you create one that receives real, incoming messages.
To enable looping in workflows
When looping is enabled, you can draw connections from downstream output ports back to the input ports of upstream components. Looping is a useful mechanism for creating process manager patterns in your workflows. For more information, see Looping Data between Workspaces. On the canvas, loops appear as dotted connection lines.
To enable looping, select Enable Looping from the canvas menu. This setting applies to the current workflow, as well as subsequent workflows that you open.
WARNING: Looping is an advanced feature. Exercise caution to avoid creating infinite loops that may overload your FME Engines. Additionally, looping upstream of a Merge Messages action is not recommended and may lead to unexpected behavior.
To disable looping, select Disable Looping from the canvas menu. Any existing loops remain in place.
To annotate a workflow
Annotate your workflow with comments. Select a component, right-click, and select Add Annotation. Alternatively, expand and drag from the Annotation icon onto the component. To add an annotation that is not connected to a component, unselect all components, and add an annotation onto a blank area of the canvas.
To add bookmarks to a workflow
Group related components together in bookmarks. Right-click on the canvas and select Add Bookmark, or expand and drag from the Bookmark icon onto the canvas. Update the text of the bookmark header, drag the bookmark over the components you want to group, and resize as desired. To change the color of the bookmark, right-click and select Change Color.
To cut, copy, paste, or remove components in a workflow
On the canvas, right-click on the components and select Cut, Copy, Paste, or Delete. Standard browser-based keyboard shortcuts, such as Ctrl + c, may also apply.
Tip: If you are building multiple workflows across instances of the Web User Interface in separate windows or tabs, you can cut/copy and paste between them.
To disable or re-enable components in a workflow
Disabled components do not run as part of a workflow. On the canvas, select one or more components, right-click and select Disable. To re-enable, right-click and select Enable.
To add or remove a tag from a workflow
On the canvas, select Menu > Save As. In the Save As dialog, configure the tags as desired, and click OK.
Alternatively, on the Manage Automations page, select one or more worflows, and select Actions > Edit Tags.
Managing Automations
Workflows do not listen for incoming messages or run until they are started, and they cannot be edited until they are stopped. On the Manage Automations page, select a workflow, and select Actions > Start or Stop.
To open or edit an existing workflow
On the Manage Automations page, click on the workflow you want to open or edit.
Note: You cannot edit a workflow unless it is stopped. Select the workflow and select Actions > Stop. Alternatively, on the Build page of a workflow, click Stop Automation.
To change the name of a workflow
- On the Manage Automations page, select a workflow, and select Actions > Rename.
- On the Build page of a workflow:
- Click on the workflow name (beside Menu) to edit.
- Select Menu > Rename.
To remove a workflow
On the Manage Automations page, select a workflow, and select Actions > Remove.
On the Manage Automations page, click the Share with Others icon. Or, on the Build page of a workflow, select Menu > Share. Through sharing, you can grant levels of permissions on an item to other users. You can share an item if you own it, or if you are a user with Manage permission in Security, such as an administrator. For more information about sharing and ownership, see Role-Based and User-Based Access Control.
Sharing an automation may require granting additional permissions to other components in the automation, such as access to a repository to run a workspace. If these permissions are not already granted, FME Server attempts to grant them. On the Sharing Options dialog, you can view the additional permissions that are required on the automation.
To view jobs triggered by a workflow
- On the Manage Automations page, select a workflow, and select Actions > View Triggered Jobs.
- On the Build page of a workflow, select Menu > View Triggered Jobs.
Viewing Automations
The Manage Automations page lists all the automations created on your FME Server.
The columns displayed on this page are:
Note: Some fields do not display by default. To control which columns display, click the Customize Columns icon.
- Name: The user-defined name of the automation.
- Tags: The tags assigned to the automation, if any. For more information, see To filter the list of workflows, below.
- Last Updated: The time when the automation was last updated, using the following syntax:
- Started: Whether the automation is started or not. Automations do not listen for incoming messages or run until they are explicitly started.
- Owner: The user who created the automation and has full permissions on it.
- Status: The current status of the automation.
- Share: To share an automation, click the Share with Others icon. For more information, see To share a workflow.
- Id: The system-generated ID of the automation. To copy, click the Copy to Clickboard icon.
year-month-day hour:minute:second
To filter the list of workflows
- To apply a filter: On the Manage Automations page, expand the Filters bar.
- To add (or remove) tags: Use tags to organize workflows into meaningful categories on which you can filter. On the Manage Automations page, select Manage Tags.
Working with Automation Logs
Automation logs record all activities performed on workflows.
To view an Automation log
You can view all activity of an automation. You can view the full contents of an automation log, or only since the automation was last started.
- On the Manage Automations page, do one of the following:
- Select a workflow and click Actions > View Log File.
- Click an Error or Warning icon under the Status column of a corresponding workflow. The log opens with "Filter errors" or "Filter warnings" set, respectively.
- On the Build page of a workflow, select View Log File from the menu.
On the Automation Log page, use the toolbar to filter the log on Log a Message action, error, warning, or information messages. You can also:
- Display only log messages from when the automation was last started.
- Hide or display timestamps.
- Reverse the chronological order of log messages.
- Refresh the log display.
To download an Automation log
On an Automation Log page, click Download Log and select:
- Download Full Log: Downloads the full automation log
- Download Filtered Log: Downloads the log according to any filters you applied to the log view (see above).
To configure how long to keep Automation logs
On the Scheduled Cleanups page, you can configure how long, in general, to keep Automation log messages. By default, messages in Automation logs older than two weeks are removed.