By default, the Feature Inspector stops at every inspection point that you define.
You can also set inspection parameters so it will stop only when certain conditions are met.
From the menu bar, select Inspection Point > Edit Inspection Point. You can also right-click on a defined inspection point and select Inspection Point > Edit Inspection Point.
This is the default name that the Feature Inspector assigns to the inspection point. You can rename any inspection point.
Check this box to define test clauses for the inspection point.
The Value columns may be a literal constant, an attribute name preceded by the value-of operator (&), or an attribute value function. If it is an attribute value function, the function will be executed on the current feature and the result will be used for the test.
The operands can consist of:
You can pick the attribute name from the pull-down list in the grid, or you can type it with the leading &.
@FunctionName(argument1,argument2,...)The function must be typed in directly into the grid, and must follow the FME syntax for functions. Choose Help > FME Functions and Factories to see a complete list of functions that can be called.
anyConstantYou can type the constant in the Test Clause grid.
The grid dialog for the Tester makes it easy to specify any of the above inputs to a test or set of tests.
The Operator column is one of <, >, =, ==, !=, >=, or <=.
The Pass Criteria defines how multiple clauses are interpreted in the final classification of the incoming feature.
You can choose one of three test scenarios:
| Scenario | Pass Criteria | Description |
|---|---|---|
| One test is required for the input feature to be classified as PASSED. | One Test (OR) | In this case, as long as one of the test clauses is true, then the feature is PASSED. This is an OR test (test1 OR test2 OR test3). If any one is true, then the result is true. |
| All tests are required for the input feature to be classified as PASSED. | All Tests (AND) |
This is stricter than One Test (OR) because all tests must pass in order for the result to be true (test1 AND test2 AND test3). |
|
Create your own test expression. This is useful when you need fine-grained control over when you want the Feature Inspector to stop. |
Composite Test |
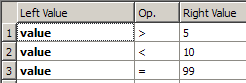
If, for example, you want to check whether the value of an attribute is between 5 and 10, or equals 99, you can set up three test expressions: Clause 1 : x > 5 Clause 2 : x < 10 Clause 3 : x = 99 (where x is the selected attribute in the Left Value field):
To correctly get the desired results, you require that clause 1 AND clause 2 be true (between 5 and 10), OR clause 3 is true (equals 99). In this case, choosing One Test or All Tests modes will not satisfy the test requirement. You can, however, choose Composite Test and enter the following expression in the Test Expression field: ((1 AND 2) OR 3) The numbers above correspond to the test clauses defined in the Test Clauses table. When read, the composite expression above states that Clause 1 AND Clause 2 must be satisfied, OR Clause 3 must be satisfied. |
By default, the Comparison Mode is set to Automatic (compare as numbers if possible).This means the Tester will first try to convert the operands to numbers. If it is successful, it will compare them as numbers. If it is still not successful, it will treat operands as strings.
Alphanumeric Strings: Say you have a string that is labeled "4E5". If you choose Automatic (compare as numbers if possible), it is possible that it will be treated as a number. If you want it treated as a text string, set the Comparison Mode to String (always compare as text strings) – this ensures that the Tester will always treat the operands as strings, and will compare them as strings.
The current hit count is shown on the right.