FME Form: 2026.2
You can overlay your data onto a background map, which allows you to view your data in context.
For example, if you have a dataset that contains roads in a specific city, you can overlay this data1 onto a background map of the same area:
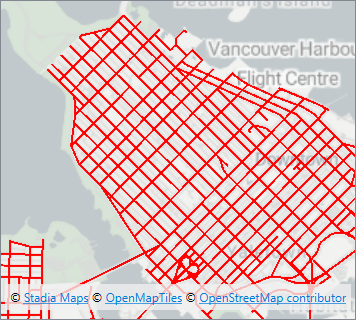
When you apply a background map, both the dataset you open and the background map dataset appear together in the View window and the Display Control.
Only features of the dataset you open can be selected for viewing in the Record Information window or Table View. You cannot zoom in or otherwise change the view of the background map: the focus is always on your own data.
Note Background map data is reprojected to one of the coordinate systems referenced by the dataset(s) that comprise your view. If you want to reference the coordinate system of the background map when viewing coordinates in the Status Bar, use the drop-down list to select it. For more information, see Changing Coordinate Systems in the Status Bar.
Getting Started with Background Maps
You can create and save multiple background maps, and reuse them in your views.
- Do one of the following:
- If you have not previously added any background maps, click Add a background map from the toolbar.
- If you have previously added background maps, select Switch to new background map from the background map drop-down control to the right of the toolbar. Alternatively, right-click on the background map in the Display Control and select Switch to new background map.
The Add Background Map dialog opens.
- Source: Select the background map you want to apply to the view.
- Name: Give the background map a name. FME Data Inspector saves the background map and all of its settings with this name, so you can reuse it in future views.
- Apply the remaining settings, depending on the Source. For more information, see Background Map Source Settings, below.
- Click Save. The background map appears in the View window and Display Control. Additionally, the Add a background map toolbar control is replaced with a drop-down tool that you can use to turn off the background map, switch to a different one, or add new ones.
To Add and Use More Background Maps
On the background map drop-down control to the right of the toolbar, select Switch to new background map. Or, right-click on the background map in the Display Control and select Switch to new background map.
To Switch to a Background Map You've Already Created
On the background map drop-down control to the right of the toolbar, select the background map you want to use. Or, right-click on the background map in the Display Control and select it from the context menu.
To Turn Off a Background Map
On the background map drop-down control to the right of the toolbar, select Background map off. Or, right-click on the background map in the Display Control and select Background map off.
To Add, Edit, Duplicate, or Remove Background Maps
On the background map drop-down control to the right of the toolbar, select Manage background maps. Or, right-click on the background map in the Display Control and select Manage background maps. In the FME Options Background Maps pane, right-click on a background map name and select Edit, Duplicate, or Remove as desired. You can also remove a background map with the (-) button. To add a background map, use the (+) button.
Background Map Source Settings
| Option | Description |
|---|---|
|
Esri ArcGIS Map Service |
You can access both ArcGIS Online and ArcGIS Enterprise map servers through this background map source. If you already have an account, enter the account credentials. If you do not have an account, follow the link in the dialog for a free trial of ArcGIS Online.
|
| HERE WeGo Maps |
|
| Japan GSI Maps | Constraints: Click browse to open a list of available maps. (To narrow the choices, enter a string in the Search bar.) Select a map and click OK to accept the selection. The selection displays in the Map List field. |
|
MapBox Web Map Tile Service |
|
| Microsoft Bing Maps |
|
| OGC WMS (Web Map Service) |
Specify the URL of the map server you want to access. If the specified server requires authentication, check Use Network Authentication, and specify the authentication method and credentials, if applicable. Specify Constraints, Map Options, Schema Attributes, and Search Envelope parameters as desired. |
| OGC WMTS (Web Map Tile Service) |
Specify the URL of the map server you want to access. Specify the Layer you want to use. If the specified server requires authentication, check Use Network Authentication, and specify the authentication method and credentials, if applicable. Specify Layer Options, Tile Selection Options, and Schema Attributes as required. |
| Precisely Maps |
API Key: Your Precisely API Key. Map Theme: The look of your background map: Bronze, Iron, or Steel. |
| Stadia Maps |
API Key: The API key for your Stadia Maps account. Map Style: Browse to select a list of available map styles. Use EU Endpoints: If Yes, map tiles are only retrieved from Stadia’s EU-based servers. |
| Tiled Web Map XYZ |
Tile URL Template: The URL of the Tiled Web Map XYZ server you want to access. Tiled Web Map XYZ expects a URL with XYZ placeholders; for example:
Text: The copyright attribution required by the map server. Refer to the service's documentation for what is required to display. This field can accept a hyperlink tag; for example, <a href="openstreetmap.org/copyright">OpenStreetMap</a> Min. Zoom Level: The minimum zoom level offered by the server. The tiles at this zoom level will continue to display if you try to zoom further out. Zooming too far out may cause lag and/or requests to the service that timeout or are throttled. Defaults to 0. Max. Zoom Level: The maximum zoom level offered by the server. Defaults to 18. |
|
Others |
Allows you to pick any dataset as a background map. This option is best if you already have data that can be used in this scenario. Select a Format and Dataset to use as the background map. Parameters (Optional) : Specify any format-specific settings that may be relevant to accessing or rendering the data. If you do not change these parameters, in most cases, FME uses default settings. For detailed information on format parameters, click Help on the parameter dialog. Coord. System (Optional): Specify an alternate coordinate system to project the background map. |