|
To access feature type parameters, click the gear icon Tip To always display the editor in FME Workbench, you can select View > Window Layout > Parameter Editor.
General All feature types share similar General parameters, which may include Feature Type Name, Reader or Writer information, and Geometry. In most Writer Feature Type parameter dialogs, you can also control Dynamic Schema Definitions. Some database formats accept Table or Index Qualifier prefixes on the output table feature type. |
 on a feature type in the
 Features written to the database have the destination table as their feature type, and attributes as defined on the feature type.
Sheet Settings
The writer mode can be specified on the feature type or on individual features.
At the feature type level, the writer mode is specified by this parameter. It may be superseded on individual features by the fme_db_operation format attribute when the Writer Mode is not Insert.
Valid feature type writer modes are listed below:
| Mode | Description |
|---|---|
| Insert |
Appends features to the end of the sheet, or writes them to an exact row and/or column. Any data that already exists in that location will be overwritten. If there is a row value specified for the Row Number Attribute, that row will be used instead. Note The Insert feature type writer mode will ignore any feature-level writer modes using fme_db_operation. If per-feature writer modes are desired, consider using Update at the feature type level (described below).
|
| Update |
Causes the row corresponding to the feature’s value specified in the Row Number Attribute to have its data changed to the values on the incoming feature. If an attribute is missing on the incoming feature, the existing cell value will not be overwritten. Note In FME versions before 2021.1, the Use Attribute Names as Column Positions option must be enabled for this to behave as expected.
|
| Delete |
Deletes the values in the row corresponding to the feature’s value specified in the Row Number Attribute. Only a number of columns equal to the amount of columns on the incoming feature will have their data and formatting removed. |
- No (default) – The columns will be written in the order on the schema.
- Yes – Treat attribute names, such as A, B, or C as the column name in which to write the data.
The writer allows you to specify an input attribute to contain the value of the row number identifier to be used for per-feature Update and Delete operations.
The default row number attribute is the xlsx_row_id attribute produced by the Excel reader to hold the row number, but it can be changed to any attribute.
If the feature type that you are creating or updating is a table, you can choose and apply a style from the icon list (which matches Excel's table styles).
This parameter allows the users to freeze the first n rows, where n is the last row to be frozen. For example,
- 1 – the first row is frozen
- 2 – the first two rows are frozen
- 5 – the first five rows are frozen
In Excel this feature is called Freeze Panes, and it allows you to freeze a portion of the sheet so that certain rows like column headers remain visible while scrolling.
This option has no effect on named ranges.
This parameter specifies whether or not to write the attribute names when inserting data.
If no template file is used, this parameter has an effect only if the sheet or named range is being created or has been dropped or truncated prior to insertion. Otherwise, attribute names will not be added to existing worksheets or named ranges.
Field Names Row Formatting
This parameter sets the format for the entire field names row.
Enabling this option allows you to set the row height, font style, background color and pattern, cell borders, and text alignment. See Formatting in the User Attributes topic for a detailed description of each option.
-
Yes – Any column formatting will be applied to the Field header.
-
No – The column Header will be unformatted (black).
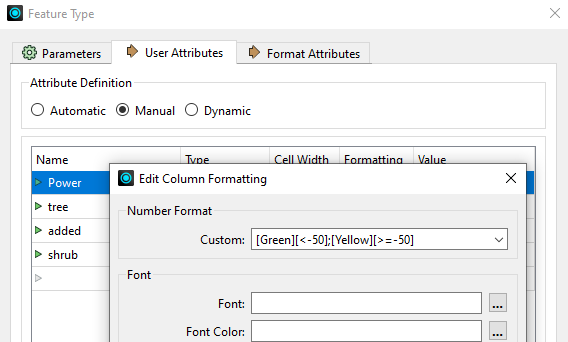
In the example below, the Power column contains a custom format string: [Green][<-50];[Yellow][>=-50]
|
If |
and |
Then |
|---|---|---|
|
Format Field Name Row = Yes
|
Value is less than 50 |
Power column number format is Green |
|
Value is greater than or equal to 50 |
Power column number format is Yellow |
Drop/Truncate
- Yes – The worksheet is deleted and recreated. Formatting and data in the extents of the existing named range are lost, but formatting in cells that exist outside the named range is unaffected. Original extents of the named range are lost. A new named range is created using the numbers specified in the parameters Named Range Start Column and Named Range Start Row.
If a template file or template sheet is specified as a writer parameter, the option to truncate the existing sheet or named range is applied to the template sheet before it is copied to the destination file. Inserted items such as charts and pictures are not deleted.
When this parameter is set to Yes, formatting such as cell color and column widths that exist in cells outside the data extents remain. Data and formatting in the extents of the existing named range is lost, but formatting in cells outside this existing named range is unaffected.
Start Position
If writing a Named Range or Table, as determined by the feature type name, this parameter specifies the starting column in the sheet where the Named Range or Table will be defined if it does not exist.
If writing a Named Range or Table, as determined by the feature type name, this parameter specifies the starting row in the sheet where the Named Range or Table will be defined if it does not exist.
This parameter specifies a starting column location for writing data in the sheet identified by the feature type name. This index applies to cell-based data but does not apply to raster or other non-cell-based data.
Row indexes are valid values between 1 and the maximum number of columns allowable in the sheet.
This parameter specifies a starting row location for writing data in the sheet identified by the feature type name. This index applies to cell-based data but does not apply to raster or other non-cell-based data.
Row indexes are valid values between 1 and the maximum number of rows allowable in the sheet.
Template Options
When you specify a Template File on the writer, this parameter allows you to specify the template sheet to use for this feature type.
Named ranges that exist on the template sheet are not duplicated.
If the template sheet is not being modified, setting this parameter to Yes will remove the sheet from the output file.
Default: No
Protect Sheet
Specifies whether to enable sheet protection on the current sheet corresponding to this feature type. Sheet protection is useful to prevent someone from accidentally or deliberately changing, moving, or deleting important data.
Both password and non-password protection are supported. There is currently no way to protect the entire spreadsheet to prevent addition, removal, or rearranging of worksheets.
When considering permissions in Excel, it is important to understand the distinction between locked and unlocked cells, and when cells are and are not locked.
By default, all cells are locked, which means that many permissions (specified below) might not behave as you expect. For example, the Delete Unlocked Columns permission will only allow you to delete columns that were already marked as Unlocked when the sheet was protected.
Scenarios are declared as “Protected” either on first creation, or toggled after by editing them from the Excel Scenario Manager. This protection acts the same as locking or unlocking a cell. FME does not unlock cells when writing them out.
Microsoft's website contains a comprehensive description of locking, unlocking, and permissions.
There are three permission settings:
- Select Only Permissions – You can only select cells.
- View Only Permissions – You can only view worksheets.
Select permissions from the Select Specific Permissions Items dialog box.
|
Specific Permission Item |
|
|---|---|
|
Add hyperlinks to unlocked cells |
|
|
Delete unlocked columns |
|
|
Delete unlocked rows |
|
|
Edit unlocked objects |
Edit unlocked cells and graphic objects, such as images, charts, shapes or text boxes, and add comments. |
|
Edit unprotected scenarios |
Add scenarios, and remove or edit scenarios that are not protected. |
|
Format cells |
Format locked or unlocked cells, and by extension, allows users to format entire columns or rows. |
|
Format columns |
Format entire columns, but not individual cells. |
|
Format rows |
Format entire rows, but not individual cells. |
|
Insert columns |
|
|
Insert rows |
|
|
Select locked cells |
Select locked cells. |
|
Select unlocked cells |
Select unlocked cells. |
|
Sort unlocked cells/rows/columns |
Sort only unlocked cells, rows, or columns. |
|
Use Autofilter on unlocked cells |
AutoFilters based on the filter specified in the template file. |
|
Use PivotTable & PivotChart on unlocked cells |
Manipulate Pivot tables or charts already created for cells on the given sheet. |
Advanced
This parameter specifies a relative order of the feature type. Valid values are all positive integers (starting from 1).
The sheet with the lowest relative order will be the first worksheet in the spreadsheet, with worksheets having a higher order placed after it. If a value is not specified, then the sheet will be placed after all worksheets with a specified sheet order. If two worksheets have identical sheet order values, then the two will be ordered according to their incoming order.
If the sheet feature type has no specified order, but it contains a named range or table feature type which does, then the order on the named range or table will be used. If the sheet with no order contains two named ranges or tables with different sheet orders, then one of those values will be selected arbitrarily. Therefore, to avoid ambiguity, it is always best to specify the order directly on the sheet feature type.
Example
If you write 7 worksheets in the form of [sheetName,sheetPosition]
{(A, ),(B,9),(C, ),(D,4),(E,4),(F, ),(G,2)}
the worksheets are written in the order
G,D/E,B,A/C/F
where the order of (A/C/F) and (D/E) are dependent on their incoming order to the writer.
Using Feature Type Fanout will pass the sheet order of the template feature type to all its fanned out feature types. (See the topic Setting Feature Type Fanout in FME Workbench help.)
You can embed a map or raster image from another source directly into a spreadsheet. This parameter determines which raster format will be used for rasters written to the spreadsheet. There are three supported options:
- PNG (default)
- JPEG
- BMP
When sending a raster feature to the writer, there are several attributes you can add to modify the result. See Raster Format Attributes for more information.