Tips for Adding and Managing Feature Types
The Writer schema defines "what we want" as a destination dataset. So if you want to write data to a particular layer, in a particular dataset, then you have to ensure that the layer is defined as a feature type in the canvas.
In some cases, this happens automatically. When you generate a workspace, the source dataset(s) you choose are scanned and all of the layers within get matching feature type objects in the workspace – both on the reader and the writer.
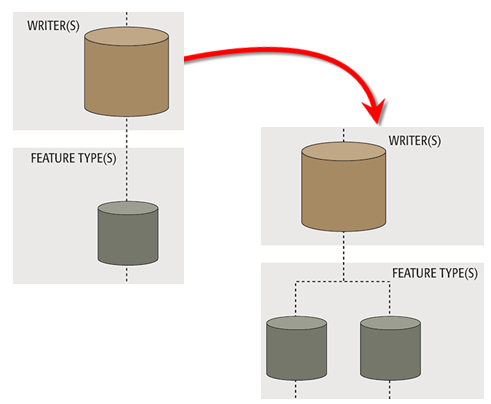
However, in most cases you need to manage Writer feature types separately, because what you want from the Writer is not the same as what you have in the Reader. For example, if you want to divide an incoming layer of data into two layers in the output dataset, you will need to add a new Writer feature type.
Adding a Writer feature type manually has this effect on the hierarchy diagram. Your output was designed to have only a single layer; now it will have two.
Feature Types can be added manually to a writer using Writers>Add Feature Type on the menubar.
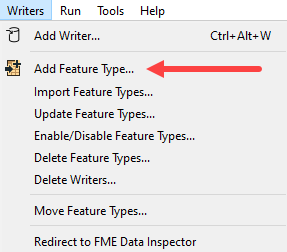
Selecting Add Feature Type places a feature type object on the workspace, and then opens the Feature Type dialog so you can edit the feature type's properties.
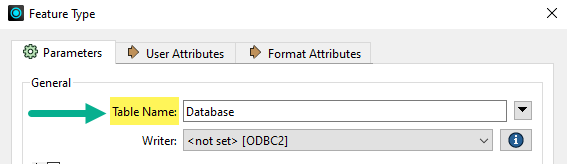
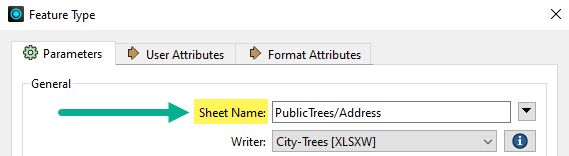
Similar to editing the schema, the Parameters tab can be used to define the new feature type’s name.
|
Feature Type names use format-specific terminology, so the label might be Feature Class, Layer, Sheet Name, Table Name, or whatever terminology is specific to the format of data you are writing: |
|
|
After a feature type is added, the schema is defined in the User Attributes tab.
The Import Feature Types function adds feature types to an existing dataset by importing the schema from any dataset. This second dataset could be the same one as is being read, but this isn’t necessary; in fact, it doesn’t even need to be in the same format – the schema definition is the important part, and FME can read that from any format.
- From the Readers or Writers menu, select Import Feature Types. If you have more than one reader, you will be prompted to select the dataset to which you want the schema added.
- From the Import Feature Types dialog, specify the format and dataset (and parameters and coordinate system, if applicable) and click OK.
The log will display processing information and the feature types will be added to the selected dataset.
You can also choose to import feature types from a selected format in an entire folder by clicking the Advanced Browser button.
When you are adding a new Writer, you can also control the feature types that are added to the workspace:

There are six options for adding feature types:
- Automatic: Adds a new feature type with the attribute definition parameter set to automatic. This is the default.
- Manual: Adds a new feature type with the attribute definition parameter set to manual.
- Copy from Reader: Adds a new feature type with the attribute definition parameter set to manual, but predefined to the schema of an existing Reader feature type.
- Import from Dataset: Adds a new feature type with the attribute definition parameter set to manual, but predefined to the schema of an external dataset (just like using the Import Feature Types tool).
- Dynamic: Adds a new feature type with the attribute definition parameter set to dynamic.
- None: Does not add any new feature type.
When adding a Writer, it is possible to create a new feature type whose attribute schema is predefined to that of an existing Reader. However, if you already have a Writer, you can still carry out the same procedure of copying a Reader schema. This is simply done by selecting the required Reader feature types, right-clicking them, and using the option Duplicate on Writer.

The command causes duplicates of the Reader feature types to be added to the writer, and source/destination feature types to be automatically connected.
At least one writer must exist in the translation hierarchy, or this option is disabled.
To remove selected feature types, choose Delete Feature Types from the Readers or Writers menu and check the applicable boxes.
You can also select the feature types in the canvas or the Navigator pane and press the Delete key.
Move Feature Type is enabled only when you have more than one destination dataset and at least one destination feature type in the workspace.
It is used to quickly change the dataset for a group of feature types. For example, if you have a MIF dataset with feature types and Oracle dataset without any feature types. You can quickly switch all the MIF feature types to Oracle feature types by changing their associated dataset. All the MIF feature types will be moved over to the Oracle dataset.
You can also do this using one feature type at a time by following these steps:
- Display the Destination Feature Type dialog.
- Click on the "Dataset:" drop-down list box and choose from the list of datasets (this changes the feature type's dataset).
To disable a feature type and all of its links, right-click on a feature type and choose Disable.
To disable multiple feature types, select all of them, then right-click and select Disable.