FME Form: 2025.2
Publish a Workspace, Transformer, or Custom Format
Workspaces, custom transformers, and custom formats are published to specific folders (called "repositories") on FME Flow. You can also update previously published items in the repository by adding or changing the associated resources.
- FME Flow Connection: Specify the connection for the FME Flow to which you want to publish. For more information, see Connecting to FME Flow.
- Repository Name: The name of the repository to which you want to publish. Select a name from the pull-down list. To create a new repository (and description) on the FME Flow, click the New... button.
- Commit: This control appears only if version control is enabled on the FME Flow. To save the file you are uploading to your file version history on FME Flow, click Commit. On the Versions Options dialog, check Add to Version History. Optionally, amend the version description as you want it to appear in the upload history on FME Flow. When finished, click OK. (For more information, see Version Control in the FME Flow documentation.)
- Workspace Name: To publish a new workspace, accept the default name in the field, or type a new name (including the workspace .fmw file extension).
- Existing Workspace List: These items are currently stored in the selected repository. You can select an item from the list to overwrite it with a new workspace, or update its resources.
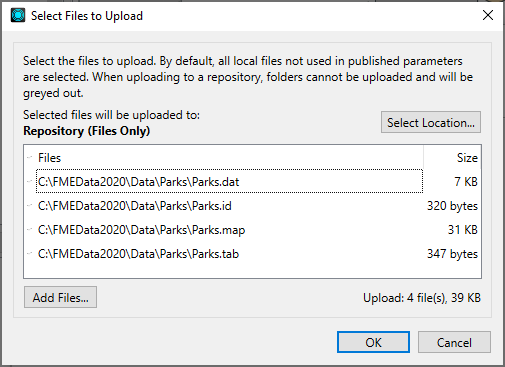
- Upload data files: If the workspace, custom transformer, or custom format has file resources that need to be uploaded, check this box. Then, click Select Files to verify the list of files to be uploaded.
- Select Files: Opens the Select Files to Upload dialog, where you can select from the list of available file resources that need to be uploaded with the workspace.
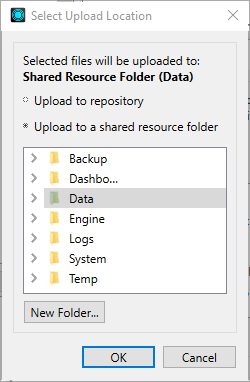
- Upload to repository: The files associated with the resource are uploaded to the repository you specified in the Publish to FME Flow dialog. The files are available only to workspaces in the same repository.
- Upload to a shared resource folder: The files associated with the resource are uploaded to a shared resource folder that is preconfigured in FME Flow. This is the preferred location for storing data files for use in FME Flow. Files in shared resource folders are available to all workspaces on the FME Flow, regardless of repository.

To add or remove files and folders from being uploaded, check or clear their respective check boxes. To add more files, click Add Files.
At the top of the dialog is indicated where the files are uploaded in FME Flow. In this example, the files are uploaded to Repository, which means the repository specified in the Publish to FME Flow dialog.
To change the upload location, click Select Location.

Specify the shared resource folder in which to place the files. The Data folder, or any of its subfolders you may have created in FME Flow, is the preferred location.
To create a new subfolder in which to upload the files, select an existing folder and click New Folder.
Click OK to close the Select Upload Location dialog.
Click OK again to close the Select Files to Upload dialog.
Click Next. If the workspace contains any database connections or web service connections, the Upload Connections dialog opens. Otherwise, if the workspace contains any FME Packages, the Upload Packages dialog opens. Otherwise, the Register Services dialog opens.