Workspace Compare and Merge
Technology Preview
Note: This feature is under active development. Expect changes to the current behavior, and avoid using it in production environments.
The Workspace Compare and Merge window allows you to view the differences between an original workspace and another workspace and, if desired, incorporate changes into the original workspace. This feature is useful when multiple people are collaborating on building a workspace, with each person making their own changes and contributing their own file, or version, of the workspace.
The Workspace Compare and Merge window highlights any additions, modifications, and deletions that affect how the workspace behaves when it runs. It does not highlight differences that have no impact at runtime, such as the presence of bookmarks and annotations, or the positioning of objects on the canvas.
Getting Started
To get started with workspace compare and merge, you first must have one workspace open, which you will compare with another. When you are ready to open another workspace for comparison, do one of the following:
- Select File > Compare and Merge, and select a workspace to open.
- Click the Compare icon on the Toolbar.
- Click Select from inside the Workspace Compare and Merge window. If this window is not yet open, select View > Windows > Workspace Compare and Merge.
The workspace canvas splits into two portions. One portion is your original workspace, unchanged. The other portion shows the differences between the original workspace and the workspace you opened for comparison. This portion is, essentially, a blend of both workspaces. There are two ways to identify this portion:
- A header that displays the names of both workspaces. For example:

- In this portion, additions display in green, modifications display in yellow, and deletions display in red.
Mouse over to display image:

Note:
 If your workspace consists of more than one tab, such as for custom transformers, the comparison corresponds to whichever tab is active.
You can continue to edit and perform other functions in the portion that shows your original workspace. When you save any changes, or when Merging Differences (below), the Workspace Compare and Merge window adjusts accordingly. The comparison portion always remains read-only.
Viewing Differences
The comparison portion of the workspace canvas shows all the differences between your original workspace and the one you are comparing it against. However, depending on the number of differences, this view may appear overwhelming.
By contrast, the Workspace Compare and Merge window shows the differences in list form.
Mouse over to display image:
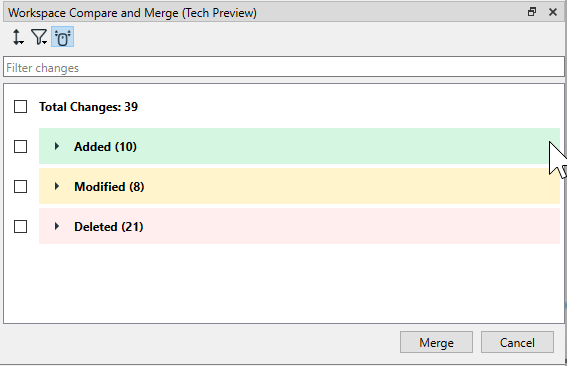
The mini-toolbar allows you to view this list in the following ways:
- Group cards by category: Specifies how to categorize the differences:
- Change Type: Differences are grouped by Added, Modified, and Deleted.
- Component Type: Differences are grouped by Transformers, Transformer Inputs/Outputs, Connections, Reader Datasets, Writer Datasets, Reader Feature Types, Writer Feature Types, Workspace Parameters, Server Parameters, and User Parameters.
- Filter by component type: Lists only differences that apply to selected components.
In either mode, you can filter the list further by entering a character string in the Filter changes box. The character string acts on the name(s) of the affected objects.
To view a list item in more detail, click its corresponding gear icon, or double-click on it. If the feature is a modification (yellow), a comparison window opens. The left side of the window shows the state of the item as compared to its state in the second workspace. The right side shows the state of the item in the second workspace as compared to its state in the original workspace.
An additional toolbar icon, Toggle synchronized navigation, controls whether navigational input in the original workspace, such as selecting or resizing, is mirrored in the comparison portion.
Merging Differences
You can choose which differences from the Workspace Compare and Merge window you want to incorporate into the original workspace.
- If you merge an addition, it is added to the original workspace.
- If you merge a modification, it is applied to the original workspace.
- If you merge a deletion, it is removed from the original workspace.
To merge differences:
- Use the checkboxes beside each difference to select the changes you want to merge.
- Click Merge.
- On the Merge Confirmation dialog, click Yes.
Tip: Merges are recorded in the History Window. You can undo and redo them as with other changes. Or, use the Undo and Redo tools from the Edit menu or the Toolbar.