Perform all tasks, where applicable:
- Start the FME Server Installer on the <webHost>.
-
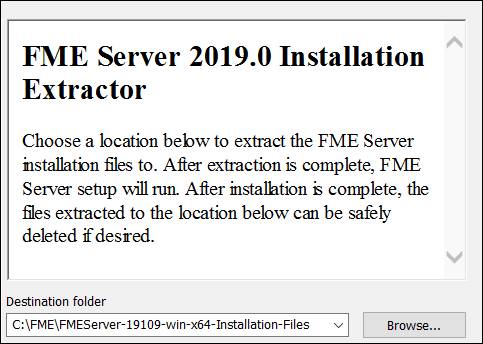
On the Installation Extractor dialog, specify a Destination folder in which to extract installation files. Note that this folder only specifies where installation files are extracted—it does not specify where FME Server program files are installed. That location is specified later in the installer.
Tip: Take note of the specified Destination folder location. Following installation, you may wish to:
 Review the installation .log file.
 Remove these files. Doing so saves almost 2 GB disk space.
Click Install.
When extraction is complete, the installer opens. Proceed through the installer to the Choose Setup Type dialog.
- Select the Distributed/Fault Tolerant setup type.
- On the Custom Setup dialog, select only the Web Services component for installation.
- On the Destination Folder dialog, specify the installation directory.
- On the User Account dialog, specify the Windows user account that will run the FME Server System Services. This account must have:
- Read/Write access to the FME Server System Share that you specify in the next dialog. The System Share is the location where FME Server stores Repositories and Resources files. (For more information, see Provide a Remote File System for the FME Server System Share.)
- Read/Write access to the FME Server installation directory that you specified in the previous dialog.
- "Log on as a service" rights on this machine. For more information, see this Microsoft Docs article.
Note: If unsure, you can update account settings for the FME Server system services after installation in the Services manager (Windows) or Linux equivalent.
- On the Existing FME Server System Share dialog, specify the UNC path to the remote file system for the FME Server System Share.
- On the FME Server Hostname dialog, enter the host name of the computer on which FME Server is installed.
- On the Web Application Server dialog, specify the web application server. If already provided, it is recommended that you shut down the service during installation.
- On the Web Application Server Port dialog, specify the port to use for communication with the web application server. Port 80 is the recommended default. If this port is in use, port 8080 is recommended.
Tip: As a best practice, specify the full UNC path to the FME Server System Share, even if it is on the same (local) machine where you are running the installer.
Note: Common applications that may be using port 80 include Skype and Internet Information Services (IIS). Either turn off these services, or select a different port, such as 8080.
- Start the FME Server Installer.
- Select the Distributed (Custom) install option.
- At the feature selection dialog, select only the Web Services component.
- Enter the host name of the computer on which the FME Server Core is installed.
- The installer prompts you for the path to the remote file system for the FME Server System Share. Enter the path to the mounted directory that was specified in Provide a Remote File System for the FME Server System Share.
- The installer prompts you to specify the web application server. If already provided, it is recommended that you shut down the service during installation. Port 8080 is recommended.
- Manually start FME Server and configure it to start automatically. See Working with the FME Server System Services.
- In order for the Data Download and Data Streaming web services to reference the correct web host location when outputting results that are returned from an FME Engine, you must manually change this location in your FME Engine configuration files:
- Locate your FME Engine configuration files, under <FMEServerDir>\Server\fmeEngineConfig*.txt
- For each file, under the SUB_SECTION for FILE_DOWNLOAD_SERVICE and STREAM_DOWNLOAD_SERVICE, modify the SUCCESS_RESPONSE directive as follows:
From:
SUCCESS_RESPONSE 0:Translation Successful|OutputLocation=!FME_AUTO_DIR_NAME!
To:
SUCCESS_RESPONSE 0:Translation Successful|OutputLocation=<webHost>/DefaultResults/!FME_AUTO_DIR_NAME_SIMPLE!
The installer prompts you for the name of the FME Server Host.
Following the installation on <webHost>, the FME Server Web Application Server automatically starts. If you used your own web application server, you can restart that service.
The FME Server Web Services and other clients communicate with the FME Server Core over TCP/IP. Requests are sent to the FME Server Core over port 7071. Result messages are returned to clients over a randomly assigned port created by the FME Server Core. Therefore, be sure to configure any firewall settings on the <webHost> with a rule to allow for full communication with the <coreHost> machines.
If you are using an Oracle WebLogic server, you must disable WebLogic authentication. This step is necessary to prevent WebLogic from intercepting login requests, which interferes with FME Server authentication.
- Locate and open the following configuration file in your WebLogic installation:
- Add (or change) the following lines before the security configuration closing tag </security-configuration>:
- Save and close the file.
<WebLogic_install_dir>/user_projects/domains/<your_domain>/config/config.xml
<enforce-valid-basic-auth-credentials>
false
</enforce-valid-basic-auth-credentials>
What's Next?
If you are configuring the FME Server Database on your own database server, and did not install the PostgreSQL database that is included with the FME Server installer, proceed to Configure the FME Server Database on a Separate Database Server. Otherwise, proceed to Log on to the Web User Interface.