Database Connection
- OS Authentication provides the necessary information to connect to the SDE server, by validating the username and password through the operating system. If you choose Parameters, you will have to fill in the username and password fields.
- Populate from Connection File… will fill in the Database Connection parameters with values extracted from an Esri Connection File. If selected, a file chooser dialog will open, and you can navigate to and select the desired connection file.
Once selected and confirmed, all the Database Connection parameters except the password will be populated from the data in the connection file. This option is particularly useful for ensuring that the Instance parameter is correct for direct connections.
Note that this option requires the installation of a compatible and licensed version of ArcGIS.
OS Authentication provides the necessary information to connect to the SDE server, by validating the username and password through the operating system.
If you choose Parameters you will have to fill in the username and password fields.
Enter the ArcSDE server name.
This field identifies the SDE database from which features are retrieved. In SDE, the dataset is referred to as the Database. The Source Dataset area of the Set Translation Parameters dialog box will default to sde, which is the dataset name you will use most often. This field is required no matter what the underlying RDBMS of the SDE. Some RDBMSes, such as Oracle, do not require a value, whereas others, such SQLServer, do. For databases that do not require the value, the field will be ignored.
Enter the username and password to access the database, user account, or wherever authentication is required.
The instance to which FME is to connect.
The usual value for systems with a single SDE instance is esri_sde.
The instance can also be of the form port:<port-number>, which is usually port:5151 (you may have to confirm this with your System Administrator).
Constraints
Specifies whether to keep the table qualifier. The full name of a table in a database is of the format:
<prefix>.<table_name>
Depending on the database format, the prefix can be <database_name>.<owner_name>, <owner_name>, or <schema_name>.
Selecting this parameter indicates that the reader should return the table name without any prefixes. This is useful, for example, when creating a workspace that will be passed on to another organization using the same table names, or performing a translation to another database format but with a different user name.
When this parameter is selected during workspace generation, the source feature types will be the table names without any prefix; otherwise, they will contain the owner name as a prefix. It is recommended that you do not change this parameter after generating the workspace, because it is possible for no features to be successfully passed onto the writer (since the writer is expecting feature types with different names).
Note: Even when this parameter is selected, if the table is owned by a user other than the current user, the prefix will not be dropped. This is to ensure that the reader will find the correct table.
Click the Browse button to select tables for export. You may only select this after you’ve completely specified the database connection.
After you click the Browse button, The ArcSDE Table List Extraction window appears while the system compiles a table list from the database. Once the table list appears, you can select one or more tables and then click OK to dismiss the window. The table name(s) will appear in the table list field in the Input Settings dialog.
An SQL WHERE clause can be applied to the selected tables, to constrain the the row selection in tables chosen in the table list (for example, NUMLANES=2).
Schema Attributes
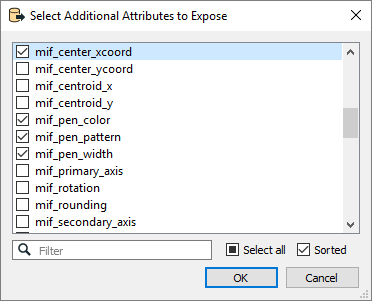
Use this parameter to expose Format Attributes in Workbench when you create a workspace:
- In a dynamic scenario, it means these attributes can be passed to the output dataset at runtime.
- In a non-dynamic scenario where you have multiple feature types, it is convenient to expose additional attributes using this one parameter. For example, if you have ten feature types and want to expose the same attribute in each one, it is easier to define it once than it is to set each feature type individually in the workspace.

Using the minimum and maximum x and y parameters, define a bounding box that will be used to filter the input features. Only features that intersect with the bounding box are returned.
If all four coordinates of the search envelope are specified as 0, the search envelope will be disabled.
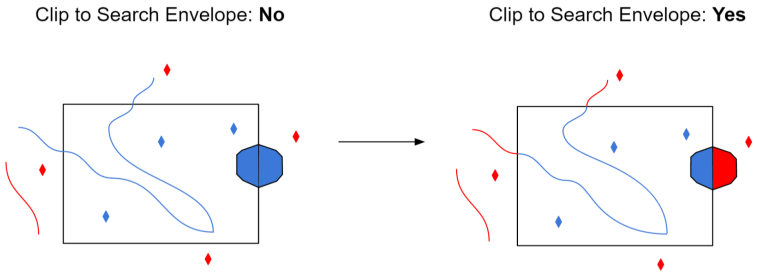
When selected, this parameter removes any portions of imported features being read that are outside the Search Envelope.
The example below illustrates the results of the Search Envelope when Clip to Search Envelope is not selected (set to No) and when it is selected (set to Yes).
- No: Any features that cross the search envelope boundary will be read, including the portion that lies outside of the boundary.
- Yes: Any features that cross the search envelope boundary will be clipped at the boundary, and only the portion that lies inside the boundary will be read. The underlying function for the Clip to Search Envelope function is an intersection; however, when Clip to Search Envelope is selected, a clipping operation is also performed in addition to the intersection.
