Connection
Specify the fully-qualified URL for the Feature Service to read.
Ensure that the URL is for a valid Feature Service, and does not point to a specific layer or table inside a Feature Service, (that is, the URL should not end with /0).
If the Feature Service requires authenticated access, specify the authentication type required by the server. The available options are:
- None: Access the Feature Service anonymously. This is the default.
- Provide Token: Use a given ArcGIS token.
- Basic: HTTP Basic authentication.
- Digest: HTTP Digest authentication.
- NTLM: Also known as Integrated Windows Authentication (IWA). Authenticates using a given username and password.
- Kerberos: Also known as Integrated Windows Authentication (IWA). Authenticates as the current Windows user. This option is supported only on Windows systems connected to a domain.
If the Authentication Type is Basic, Digest, or NTLM, specify the username.
If the Authentication Type is Basic, Digest, or NTLM, specify the user’s password.
If the Authentication Type is set to Provide Token, specify the token here.
Constraints
After you have entered a valid Feature Service, click the Browse button to select layers or tables for import. A connection window appears while the system retrieves a list of layers and tables from the selected Feature Service.
Once the list appears, you can select one or more layers or tables, and then click OK to dismiss the window. Their name(s) will appear in Layer List parameter.
Advanced
This parameter specifies the maximum number of features that may be present in a single response from the server. Reduce this value if reads are failing due to timeouts.
The value for this parameter is capped to the maxRecordCount property on the Feature Service.
Default: 1000
Schema Attributes
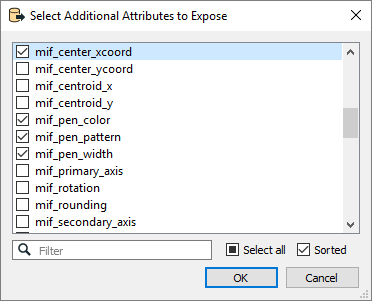
Use this parameter to expose Format Attributes in Workbench when you create a workspace:
- In a dynamic scenario, it means these attributes can be passed to the output dataset at runtime.
- In a non-dynamic scenario where you have multiple feature types, it is convenient to expose additional attributes using this one parameter. For example, if you have ten feature types and want to expose the same attribute in each one, it is easier to define it once than it is to set each feature type individually in the workspace.

Using the minimum and maximum x and y parameters, define a bounding box that will be used to filter the input features. Only features that intersect with the bounding box are returned.
If all four coordinates of the search envelope are specified as 0, the search envelope will be disabled.
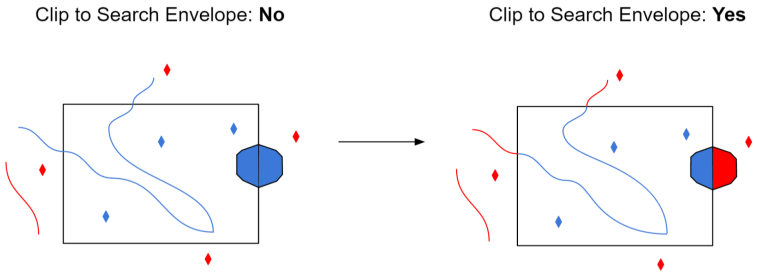
When selected, this parameter removes any portions of imported features being read that are outside the Search Envelope.
The example below illustrates the results of the Search Envelope when Clip to Search Envelope is not selected (set to No) and when it is selected (set to Yes).
- No: Any features that cross the search envelope boundary will be read, including the portion that lies outside of the boundary.
- Yes: Any features that cross the search envelope boundary will be clipped at the boundary, and only the portion that lies inside the boundary will be read. The underlying function for the Clip to Search Envelope function is an intersection; however, when Clip to Search Envelope is selected, a clipping operation is also performed in addition to the intersection.
