The Compare Workspaces tool allows you to:
- View the differences between two workspaces, component by component.
- Incorporate components that differ from one workspace, which is designated read-only, to another, which is designated editable.
The Compare Workspaces tool is useful when multiple people are collaborating on building a workspace, with each person making their own changes and contributing their own file, or version, of the workspace.
Optionally, you can configure a git tool, such as Git Bash, TortoiseGit, and Sourcetree, to interface directly with the Compare Workspaces tool to view differences and resolve conflicts when merging workspace versions. For more information, see Integrating a git Workflow with the Compare Workspaces Tool.
What Is Compared?
The Compare Workspaces tool opens only workspace files (.fmw) for comparison. You cannot open other file types directly, such as custom transformers, for comparison. You can, however, compare files, including custom transformers, that exist inside a workspace and display in separate tabs.
The Compare Workspaces tool highlights differences that affect how a workspace behaves when it runs. It does not highlight differences that have no impact at runtime, such as the presence of bookmarks and annotations, or the positioning of objects on the canvas.
- Readers
- Reader feature types
- Writers
- Writer feature types
- Transformers
- User parameters
- FME Flow parameters
- Workspace parameters
- Connection paths
- Junctions
Getting Started
- To open the Compare Workspaces tool, do one of the following:
- From the Start tab, select Compare Workspaces.
- Select Tools > Compare Workspaces.
- Click the Compare icon on the Toolbar.
- On the Select Workspaces dialog, specify the two workspaces you want to compare:
- Editable: This workspace will open on the left side of the tool, and is editable. This is the workspace into which you can incorporate changes from the other (Read-Only) workspace.
- Read-Only: This workspace will open on the right side of the tool, and remains read-only.
- Click OK. The Compare Workspaces tool opens the specified workspaces.
Viewing Differences: An Overview
Both workspaces, Editable and Read-Only, show the differences between them in two ways:
- On their respective canvases. Note that this view does not show differences between readers, writers, user parameters, FME Flow parameters, and workspace parameters, since these elements do not display on the canvas.
- Below the canvases, in list form. This view shows differences between all compared components, including those that do not display on the canvases.
Differences are color-coded, as follows:
| Light | Dark (Canvas View) | Dark (List View) |
Meaning |
|---|---|---|---|

|

|

|
Component exists only on the left side. |

|

|

|
Component exists on both sides, but they differ from each other. |

|

|

|
Component exists only on the right side. |
Note Where possible, the Compare Workspaces tool tries to apply color-coded highlighting directly to individual differences. If not possible, the location of the difference is highlighted in outline. In these cases, the user must investigate further to locate the exact differences.
Tip You can configure a git tool, such as Git Bash, TortoiseGit, and Sourcetree, to interface directly with the Compare Workspaces tool to view differences. For more information, see Integrating a git Workflow with the Compare Workspaces Tool.
Things to Consider
When viewing differences, keep in mind the following:
- Comparisons are based on components on each side that have the exact same names, including suffix.
- Differences are not highlighted in the workspace Navigator panes. If the Navigator pane distracts you from viewing differences, you can close it. For more information, see Viewing Differences on the Canvas, below.
- The Compare Workspaces tool highlights differences that affect how the workspace behaves when it runs. It does not highlight differences that have no impact at runtime, including differences between:
- BookmarksNote Bookmarks in the Read-Only workspace that are collapsed cannot be expanded. However, you can still view the differences between the components inside them when Viewing Differences in List Form. To expand a bookmark in the Read-Only workspace, open and save it outside of the Compare Workspaces tool. Alternatively, swap the Editable and Read-Only workspaces, expand the bookmark, and swap again.
- Annotations
- Positioning of objects on the canvas.
- Grouping and ordering of user parameters in the runtime prompt.
- Bookmarks
- If a workspace consists of more than one tab, such as for custom transformers, the comparison corresponds to whichever tab is active.Warning If the Compare Workspaces tool opens workspaces with custom transformers that were last saved with their corresponding tabs closed, you are prompted to open the tabs so they are included in the comparison. If you choose not to open them, the Compare Workspaces tool may not reflect an accurate comparison between custom transformer (or nested custom transformer) tabs. For more information, see Comparing Workspaces That Contain Custom Transformers.
- You can continue to edit and perform other functions in the Editable workspace. When you save any changes, or when Copying Differences to the Editable Workspace. (below), the Compare Workspaces view adjusts accordingly. The workspace on the right side always remains read-only.
- You can swap the Editable and Read-Only workspaces to change which one becomes editable and which one becomes read-only. In the middle toolbar, click Swap. Warning If there are unsaved changes in the Editable workspace, you are prompted to save them before swapping. If you choose not to save, the changes are lost, as the editable workspace moves to the read-only side.
Viewing Differences on the Canvas
The canvas view of the workspaces shows differences only between components that FME Workbench displays on the canvas. It does not show differences between readers, writers, user parameters, FME Flow parameters, or workspace parameters.
Mouse-over to display screenshot:

You can use the following icons in the middle toolbar (between the two workspaces) to change how you view the canvases:
- Nav: Toggles display of the workspace Navigators.
- Sync: When enabled, navigational input in one canvas, such as scrolling or resizing, synchronizes with the other canvas.
Note Differences are not indicated in the Navigators.
Viewing Details
You can view the details of how components differ, including their attribute or parameter settings. To view difference details, double-click on the component. Alternatively, single-click its gear icon.
Note Where possible, the Compare Workspaces tool tries to apply color-coded highlighting directly to individual differences. If not possible, the location of the difference is highlighted in outline. In these cases, the user must investigate further to locate the exact differences.
Viewing Differences in List Form
Differences between the Editable and Read-Only workspaces are presented in list form beneath the canvas view of the workspaces. This list also includes elements that do not display on the canvas, such as readers, writers, user parameters, FME Flow parameters, and workspace parameters.
Mouse over to display screenshot: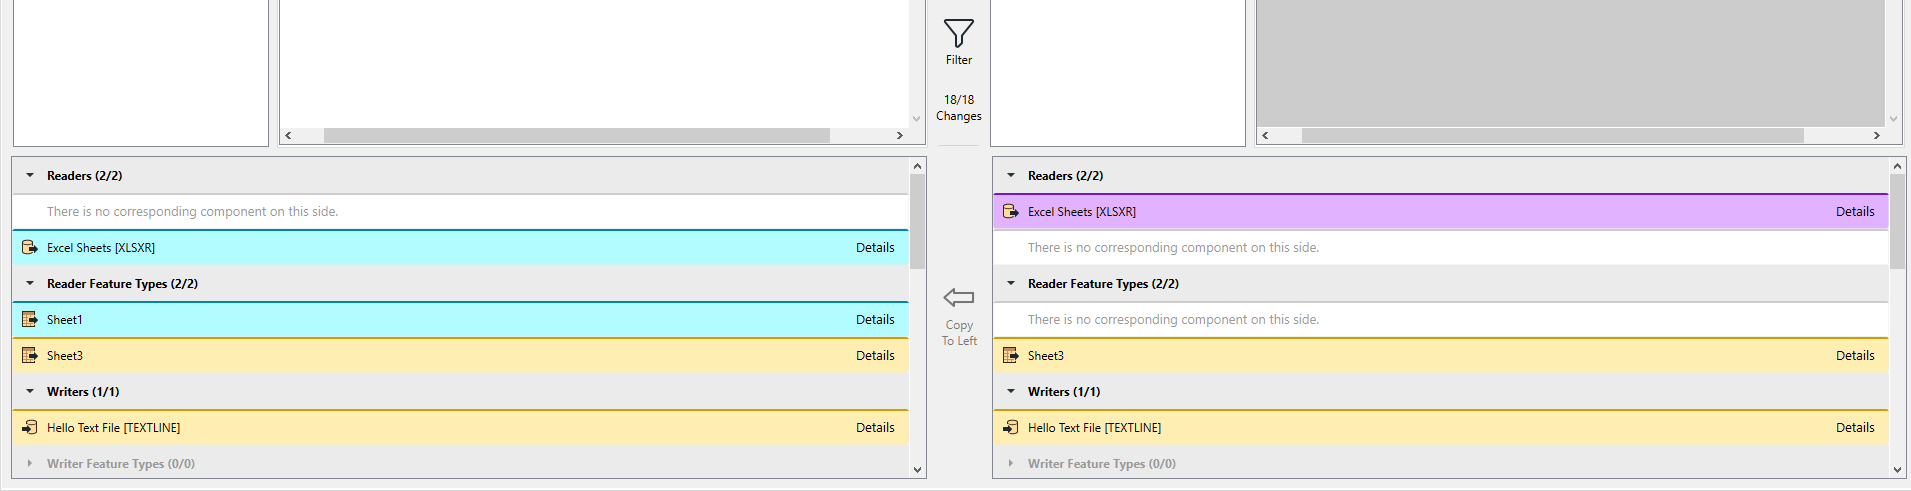
Filtering Differences
You can filter this list to limit your view of differences. In the middle toolbar, click Filter:
- By Type of Component: Lists only differences that apply to selected components.
- By Component Name: Filter the list further by entering a character string, which acts on the name(s) of the affected components.
Note Filtering also affects the canvas view of differences. The color-coding of components that are filtered out is faded, making them less prominent.
Viewing Details
To view a list item in more detail, double-click on it, or single-click on its corresponding descriptor at right. A left-right comparison window opens that shows the state of the component corresponding to the Editable and Read-Only workspaces, respectively.
Note Where possible, the Compare Workspaces tool tries to apply color-coded highlighting directly to individual differences. If not possible, the location of the difference is highlighted in outline. In these cases, the user must investigate further to locate the exact differences.
Copying Differences to the Editable Workspace.
You can choose which differences from the Read-Only workspace you want to incorporate into the Editable workspace.
From the canvas or list view, select a component and, from the middle toolbar, click Copy to Left. To select multiple components, use the keyboard shortcuts of your operating system (for example, Ctrl + select or Shift + select on Windows).
- If you select a component that exists only in the Read-Only workspace, it is added to the Editable workspace.
- If you select a component that exists in both the Read-Only and Editable workspaces, the component from the Read-Only workspace replaces the one in the Editable workspace.
- If you select a component that exists only in the Editable workspace, it is removed.
Tip A Copy to Left operation is the equivalent of a merge in a git-based version control system. You can configure a git tool, such as Git Bash, TortoiseGit, and Sourcetree, to interface directly with the Compare Workspaces tool to resolve conflicts when performing a Copy to Left operation. For more information, see Integrating a git Workflow with the Compare Workspaces Tool.
Note Copy to Left actions are not recorded in the History Window. However, you can undo and redo these actions as with other changes you make on the Left workspace. To undo, use the Undo and Redo tools from the Edit menu or the Toolbar.