Using the Attribute Connections feature allows you to quickly connect source feature type attributes to a destination feature type. If you have many connections to set, this method is usually the fastest way to do it.
To open the Attribute Connections pane, select View > Windows > Attribute Connections. Follow the instructions in the example below.
Example
You have one input attribute that you want to connect to several destination attributes. Manually connecting each one would take some time. This is a simple example that shows a few attributes:

In the Attribute Connections Window, select the applicable Feature Type Connection, then select the Source Attributes you want to connect (Shift+click to select multiple lines at one time, or Ctrl+click to select individual sources). Select the Destination Attributes to which you want to connect the selected Source Attributes.
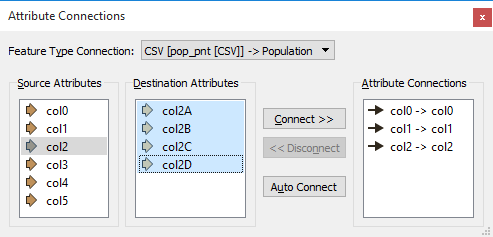
Click the Connect button.
Note: The Auto Connect button is useful if there is a clear relationship between attribute names (for example, they have the same name on both the reader and writer side).
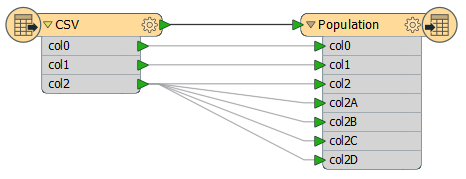
The attributes are connected in the workspace:
To quickly delete connections from the workspace: Click directly on one connection and press the Delete key, or hold down the Ctrl key and click numerous connections. To quickly select many connections, hold down the left mouse key, drag the cursor around an area, release the mouse button, and press the Delete key.