A bookmark is way to define areas of your workspace for easy access. The bookmark shades an area, usually one that is carrying out a specific task, so you can easily move to it in the workspace.
Organize a Workspace
Bookmarks play an important part in FME for a number of reasons:
- places a marker for quick access to a certain area
- divides a workspace into different, clearly marked sections
- organizes a workspace so you can move sections of transformers at one time
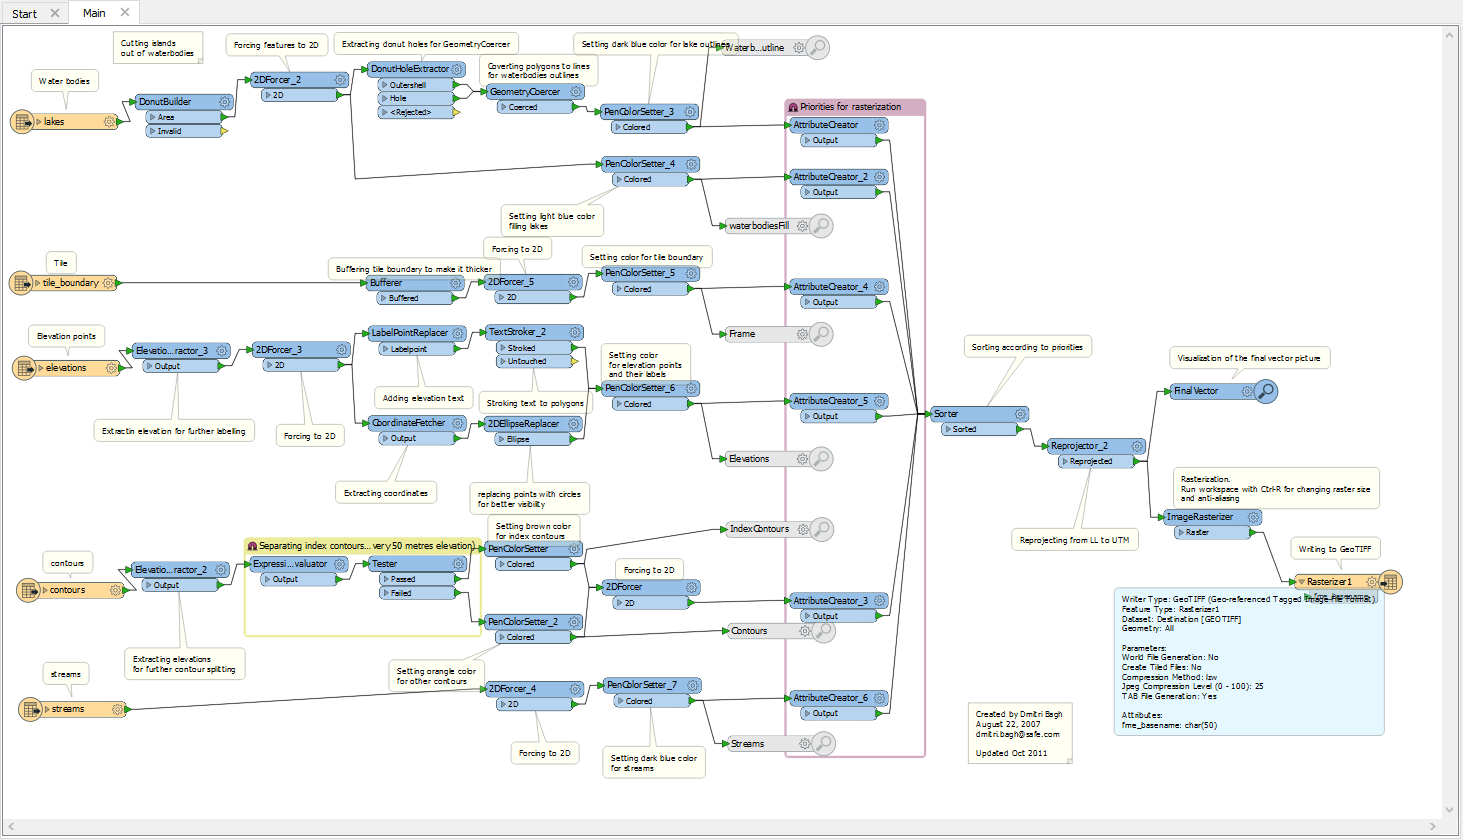
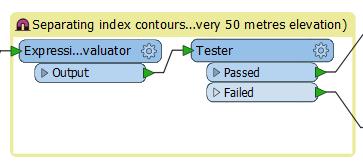
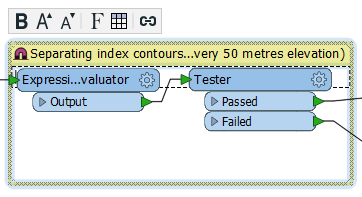
In this workspace, two bookmarks are defined where specific tasks are performed so they can be referenced more easily (mouse over the image to see a full view):
Create Notes and Provide Context
Other than using bookmarks for general organization and ease-of-use, here are some additional reasons:
- Remembering why you created a workspace: Bookmarks can help remind you why you created a workspace, and how it works.
- Deciphering someone else's workspace: Bookmarks can clarify the purpose of a workspace, and provide the necessary context for determining how it works.
Adding a New Bookmark
Selecting an area of the workspace (for example, a group of transformers) before adding the bookmark ensures that the bookmark appears in the selected area.
Click the bookmark tool  or select Insert > Bookmark.
A bookmark will appear in the workspace. The text field in the bookmark will be highlighted so you can enter a new name as soon as the bookmark appears. (Note that if the characters in your name exceed the width of the bookmark, the name will be truncated).
Changing the Background

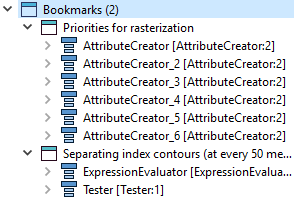
Viewing Bookmarks in the Navigator
Bookmarks names are listed as folders in the Navigator. Expand the bookmark name to view its contents:
Resizing a Bookmark
Left-click the bookmark, hold down the mouse button, and drag the bookmark's handles.
Enabling the Bookmark Magnet
By default, the bookmark's contents are attached to the bookmark. When you move it around, the contents follow. This makes it a useful tool for organizing workspaces: you can move entire sections around the canvas until they are in a good layout.
Click the magnet to toggle it on and off.
Magnet is on (contents are attached): 
Magnet is off (contents are separate): 
Moving a Bookmark
Left-click on the bookmark's border and hold down the mouse button to move the bookmark to another location on the workspace.
Changing a Bookmark's Properties
Double-click on the colored area of the bookmark's title bar to display the Edit dialog (or select a bookmark, then right-click and select Properties). The Edit dialog allows you to change the bookmark name and its color properties.
To rename a bookmark, double-click a bookmark name in the workspace.
Adding a Description
- Select a bookmark and right-click.
- From the command menu, select Edit Bookmark Description.
- Enter a description to appear inside the bookmark. You may need to resize the bookmark to make the description more visible.
When you add or edit a bookmark description, you can use the buttons on the mini-toolbar to customize it with rich-text features, including:
- Formatting text and adding lists.
- Adding tables and inserting/removing rows/columns.
- Inserting hyperlinks.
Zooming to a Bookmark
To zoom to a selected bookmark, either:
- Right-click to display the Edit menu and selectZoom to Bookmark, or
- Double-click the bookmark name in the Navigator.
Panning to a Bookmark
To center the workspace on a selected bookmark:
- Click (once) on the bookmark name in the Navigator.
Navigating Bookmarks
You can navigate through the bookmarks in a workspace. As you navigate, Workbench focuses and zooms on each bookmark.
From Toolbar under FME Options, add Show Bookmark Navigator to the toolbar. A navigator widget appears on the toolbar:

Use the left and right arrows to zoom and focus on each bookmark, sequentially, in the workspace. Alternatively, select a bookmark from the drop-down list. To zoom out to the entire workspace, select All.
Tip: When the bookmark navigator is available, you can also navigate bookmarks using the space bar (forward) and Ctrl + space bar (back).
Exporting Bookmarks to a Custom Transformer
Right-click to display the Edit menu, and select Create Custom Transformer to open the Custom Transformer Properties dialog.
Note: See Creating Custom Transformers for information on the parameters in this dialog.
The objects that were inside the bookmark appear in a custom transformer window, under a new tab. The bookmark that was in the original workspace is replaced by a link to the custom transformer.