This topic provides information for configuring FME Server security. The instructions are written based on using the Web Admin Interface.
You must have the following prerequisites in place to use FME Server security:
All web services, including the Web Connection (also known as the SOAP Service), support HTTP basic authentication and SSL.
Default Authentication and Authorization Provider
When security is enabled, the default authentication and authorization provider gives full integration with FME Server.
By default, all user and security information is stored in the FME Server repository database.
The FME Server security architecture is fully extensible and you can change it to other available authentication and authorization providers.
Client Identifier
Every web service has a client identifier that identifies the FME Server client calling context. For added security, you can also change the following property in the Web Service properties file:
SECURITY_CLIENT_ID
Property Files
Web service property files are generally found in the following location:
<TomcatDir>/webapps/<ServletName>/WEB-INF/conf/propertiesFile.properties
FME Server Client Security
All FME applications and components that access FME Server support providing user credentials such as username and password for authentication.
All clients also provide a client ID that’s used for authorization. Administrators can Resources using the Web Admin Interface.
FME Server Security Management
When security is enabled for FME Server, a Security tab shows on the Web Admin Interface. The Security web page is where administrators define permissions. The following hierarchy is in place:
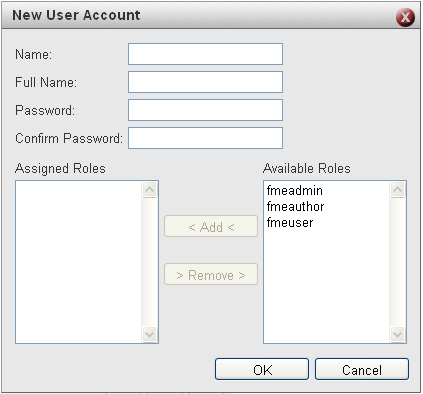
The Users page lets you create user accounts that you can then assign to Roles.
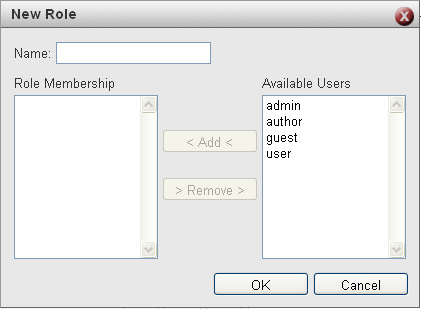
The Roles web page lets you create roles that can have Users assigned to them. You can also assign Roles to Resources.
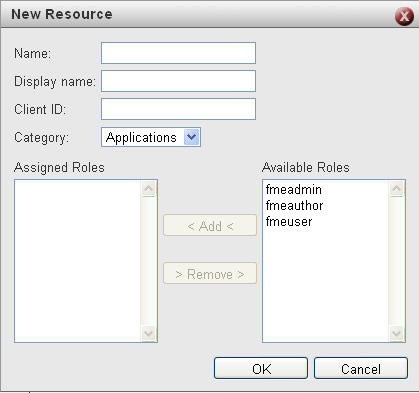
The Resources web page lists all resources that access FME Server. When Roles are assigned to a specific Resource that implies that all Users who belong to the assigned Role now have permission to access the specific Resource.
FME Server Role-based Transformations
During a transformation, Role information is also passed on to the FME Engines through the Transformation Manager as a published parameter. This means that it’s possible to create workspaces that do different things based on the User’s Role.
By default, the published parameter name is FME_SECURITY_ROLES, which is a spaceseparated list. You can change this name in the FME Server configuration file. The value of the FME_SECURITY_ROLES published parameter contains role information that can be fetched easily with the FME ParameterFetcher transformer in Workbench.
The FME Server installer provides the option to enable or disable security. When you installed FME Server you were presented with an enable security prompt. If you clicked Yes, then FME Server is set up to support security.
When security is enabled, the Web User Interface and the Web Administrator User Interface have login and logout capabilities. Also, a Security tab shows on the Web Admin Interface, which is used to administer security.
There are several levels of security you can use on FME Server:
Manually Enabling FME Server Security
To manually enable FME Server security, set the ENABLE_SECURITY option to true in the following configuration files:
Enabling FME Server SSL Support
There are two steps required to enable SSL support.
Modifying Service URLs to use HTTPS
To enable SSL for a service, open the FME Server Web Admin Interface, click the Services tab and select the desired service in the table as shown below:
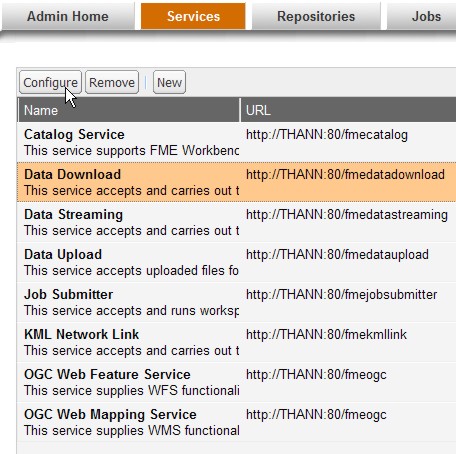
Then click the Configure button to bring up the Service Definition dialog as shown below:
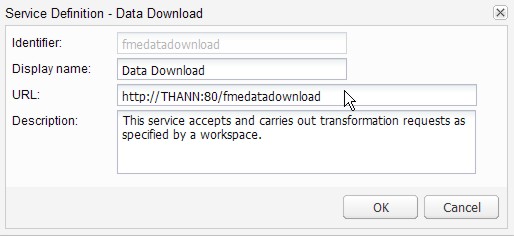
In the dialog's URL field change http to https and modify the port number if required. Typically SSL is configured on either port 8443 or 443.
Enabling SSL on the Application Server
Depending on the method, instructions to set up SSL on different application servers vary. The following example provides steps for setting up SSL for Apache Tomcat 6, using self-signed certificates.
For development and testing purposes, self-signed certificates are supported. For production use, it’s recommended you use SSL certificates from a verified SSL Certificate Authority.
For any https (SSL) page, a certificate is absolutely necessary. First, you’ll learn how to generate a keystore that contains a certificate chain using the keytool command from the Java Developer Kit (JDK). Therefore, you must have JDK installed to use this keytool command.
To set up SSL for Apache Tomcat 6 using self-signed certificates, follow these steps:
keytool -genkey -alias tomcat -keyalg RSA
If your path is not set to the Java bin directory, please go there and then type the appropriate command.

<Service name="Catalina">
element:
<Connector protocol="org.apache.coyote.http11.Http11Protocol"
port="443" minSpareThreads="5" maxSpareThreads="75"
enableLookups="true" disableUploadTimeout="true"
acceptCount="100" maxthreads="200"
scheme="https" secure="true" SSLEnabled="true"
keystoreFile="C:\Program Files\Apache Software Foundation\Tomcat 6.0\conf\.keystore"
keystorePass="changeit"
clientAuth="false" sslProtocol="TLS" />
Note: You may need to change the path for keystoreFile depending on your Tomcat installation.
<Listener className="org.apache.catalina.core.AprLifecycleListener" SSLEngine='off' />
The information in this section covers more advanced security configuration topics.
Deploying an FME Server Site with Secured and Unsecured Web Services
You can configure FME Server so that some web services require user credentials and others do not. For example, you may want to allow open access to the Data Download service, but restrict access to the Data Streaming service. This capability is possible because each web service contains a trusted user account that you can change in the service’s properties file.
If the trusted user account is granted access to FME Server, then users do not need to provide user credentials.
To enable a trusted user account for one of your services and, therefore, allow unauthenticated users access to FME Server, follow these steps:
<WebAppDir>/<serviceName>/WEB-INF/conf/propertiesFile.properties
For example, if you are using Apache Tomcat as your application server and want to provide unsecured access to the Data Download service, the properties file may be found in a path like this:
C:/Program Files/Apache Software Foundation/Tomcat6.0/webapps/fmedatadownload/WEB-INF/conf/propertiesFile.properties
There are two properties in the file that you need to change:
The FME Token Service is a new service that enables users to be authenticated in order to fully use the FME REST API. It is recommended that users use similiar level of security for any service involving tokens as they would with basic http security. For example, using https/SSL
Creating a token
A token can be created by using the web form found at http://<host>:<port>/fmetoken/
Upon authenticating the username and password, a token will be created that is valid for the specified duration.
An alternative method is to send a POST request to http://<host>:<port>/fmetoken/generate with the same parameters.
Using a token
A token that has been created can be used by sending it as a parameter in a HTTP request. For example:
http://localhost/fmerest/repositories.html?token=<token>